

Assistant
Assistant helps you create better videos faster through an iterative, chat-based interface directly inside Synthesia.
Looking to import existing content?
- To use a script exactly as written, see Import a script below (reached from the homepage).
- To generate a new script from a document, deck, or notes, see Import a file below.
What you can do with Assistant
Use Assistant to:
- Create videos from prompts and context: start with a prompt, upload files (PDFs, PowerPoints, Word documents), add URLs, or combine all of them in a single request.
- Import a script verbatim: paste an existing script to use exactly as written, word-for-word, instead of generating a new one.
- Choose your template: select any available template, including custom templates, to control the visual style and layout of your video.
- Control delivery style: choose between Dynamic (shorter scenes, frequent cuts) or Presentation (longer, denser scenes) to match your content type.
- Review an editable outline: see and adjust each section's title and key points before Assistant generates any scenes.
- Apply your brand kit: apply your brand's colors, fonts, and logo to motion graphics. (Enterprise only)
- Iterate on your script and visuals through chat: refine both script and visuals using natural language prompts like "make this shorter" or "make this more engaging."
- Get expert feedback: ask Assistant for suggestions, like "How can I make this more engaging?" or "Act like a VP of learning and development. What would you change?"
- Generate assets using stock styles: Assistant generates motion graphics, b-roll, images, and a-roll using stock styles, producing more consistent, polished visuals across your video.
- Create motion graphics: Assistant can generate motion graphics as a dedicated asset type alongside b-roll and images. Note that asset generation can take a few minutes.
- Work in Storyboard view: use the simplified, macro-level Storyboard editor designed for script-level iteration, especially helpful for new creators.
How to access Assistant
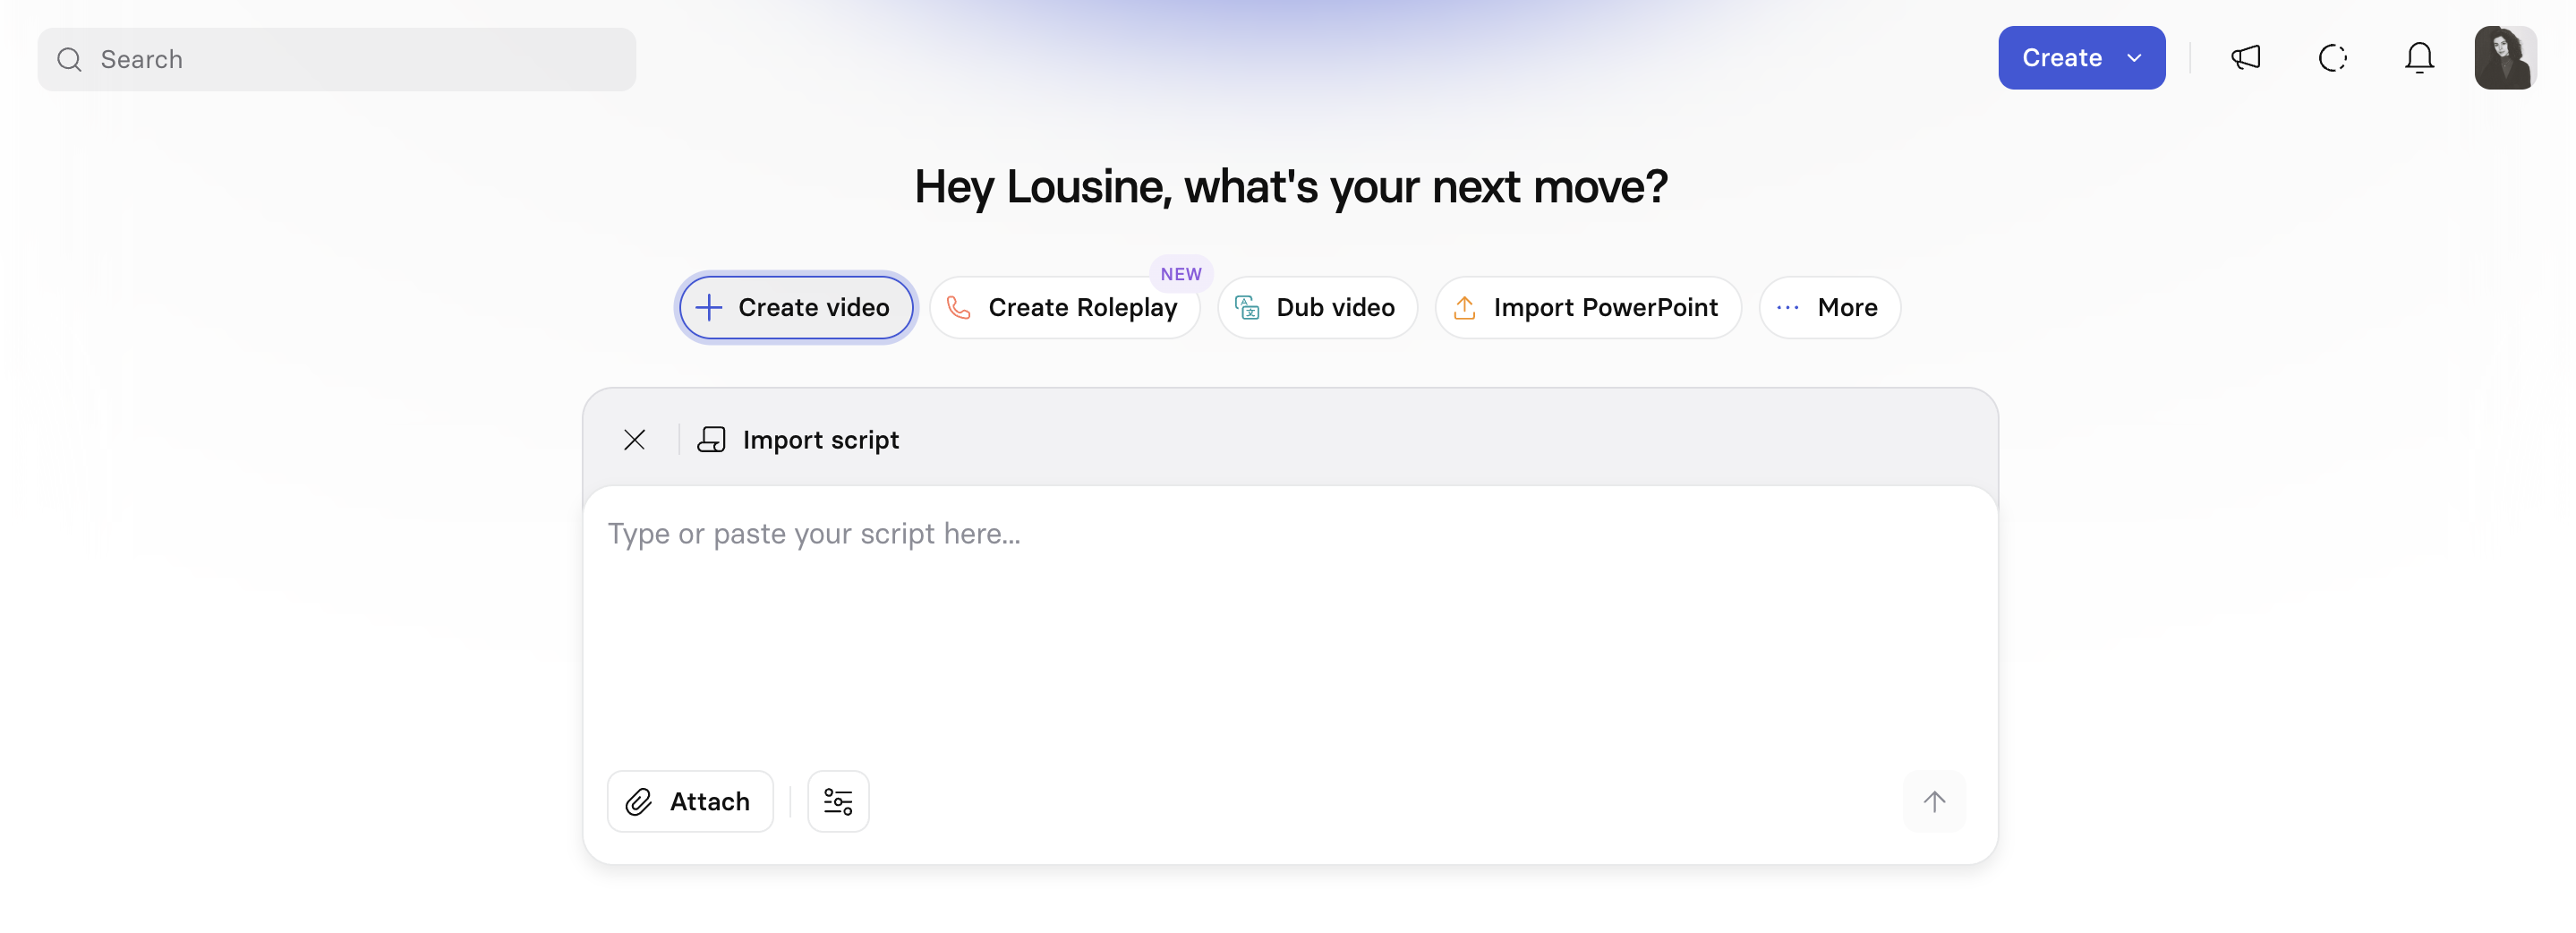
Type your prompt directly into the prompt box on the homepage.
Accessing the legacy AI Video AssistantYou can access the legacy AI Video Assistant from the
Createbutton:
- Select
Createin the top right, thenVideo- Select either
Prompt an idea, orImport a file(also has the option to use a script verbatim)- Enter a file, prompt, or script to get started
Creating videos with Assistant
Provide context and craft your prompt
Assistant accepts substantially more context than previous versions, leading to higher quality, personalized videos.
Upload files and URLs:
- Upload a single file or multiple files, up to 10MB each (
.ppt,.pptx,.pdf,.doc,.docx, or.txtfile(s)). - Add URLs to reference online content.
- Combine files, URLs, and prompts together, or submit files on their own without writing a prompt.
- Be specific about how Assistant should use the information (for example, "Just look at the last part" or "Reference these pages").
Set a duration:
- Auto, Short, Medium, or Long.
Set the output language:
Assistant has no dedicated language setting — the output language is determined as follows:
- If you write a prompt, the script defaults to your prompt's language, even if it differs from any attached files.
- If you attach files without writing a prompt, the script defaults to the language of those files.
- If you attach files in more than one language without a prompt, or want a language different from your prompt or files, state your intended language directly in the prompt (for example, "Write this in German").
Review the outline
After you submit your prompt, Assistant returns an editable outline of the video's structure (each section's title and key points) before generating any scenes.
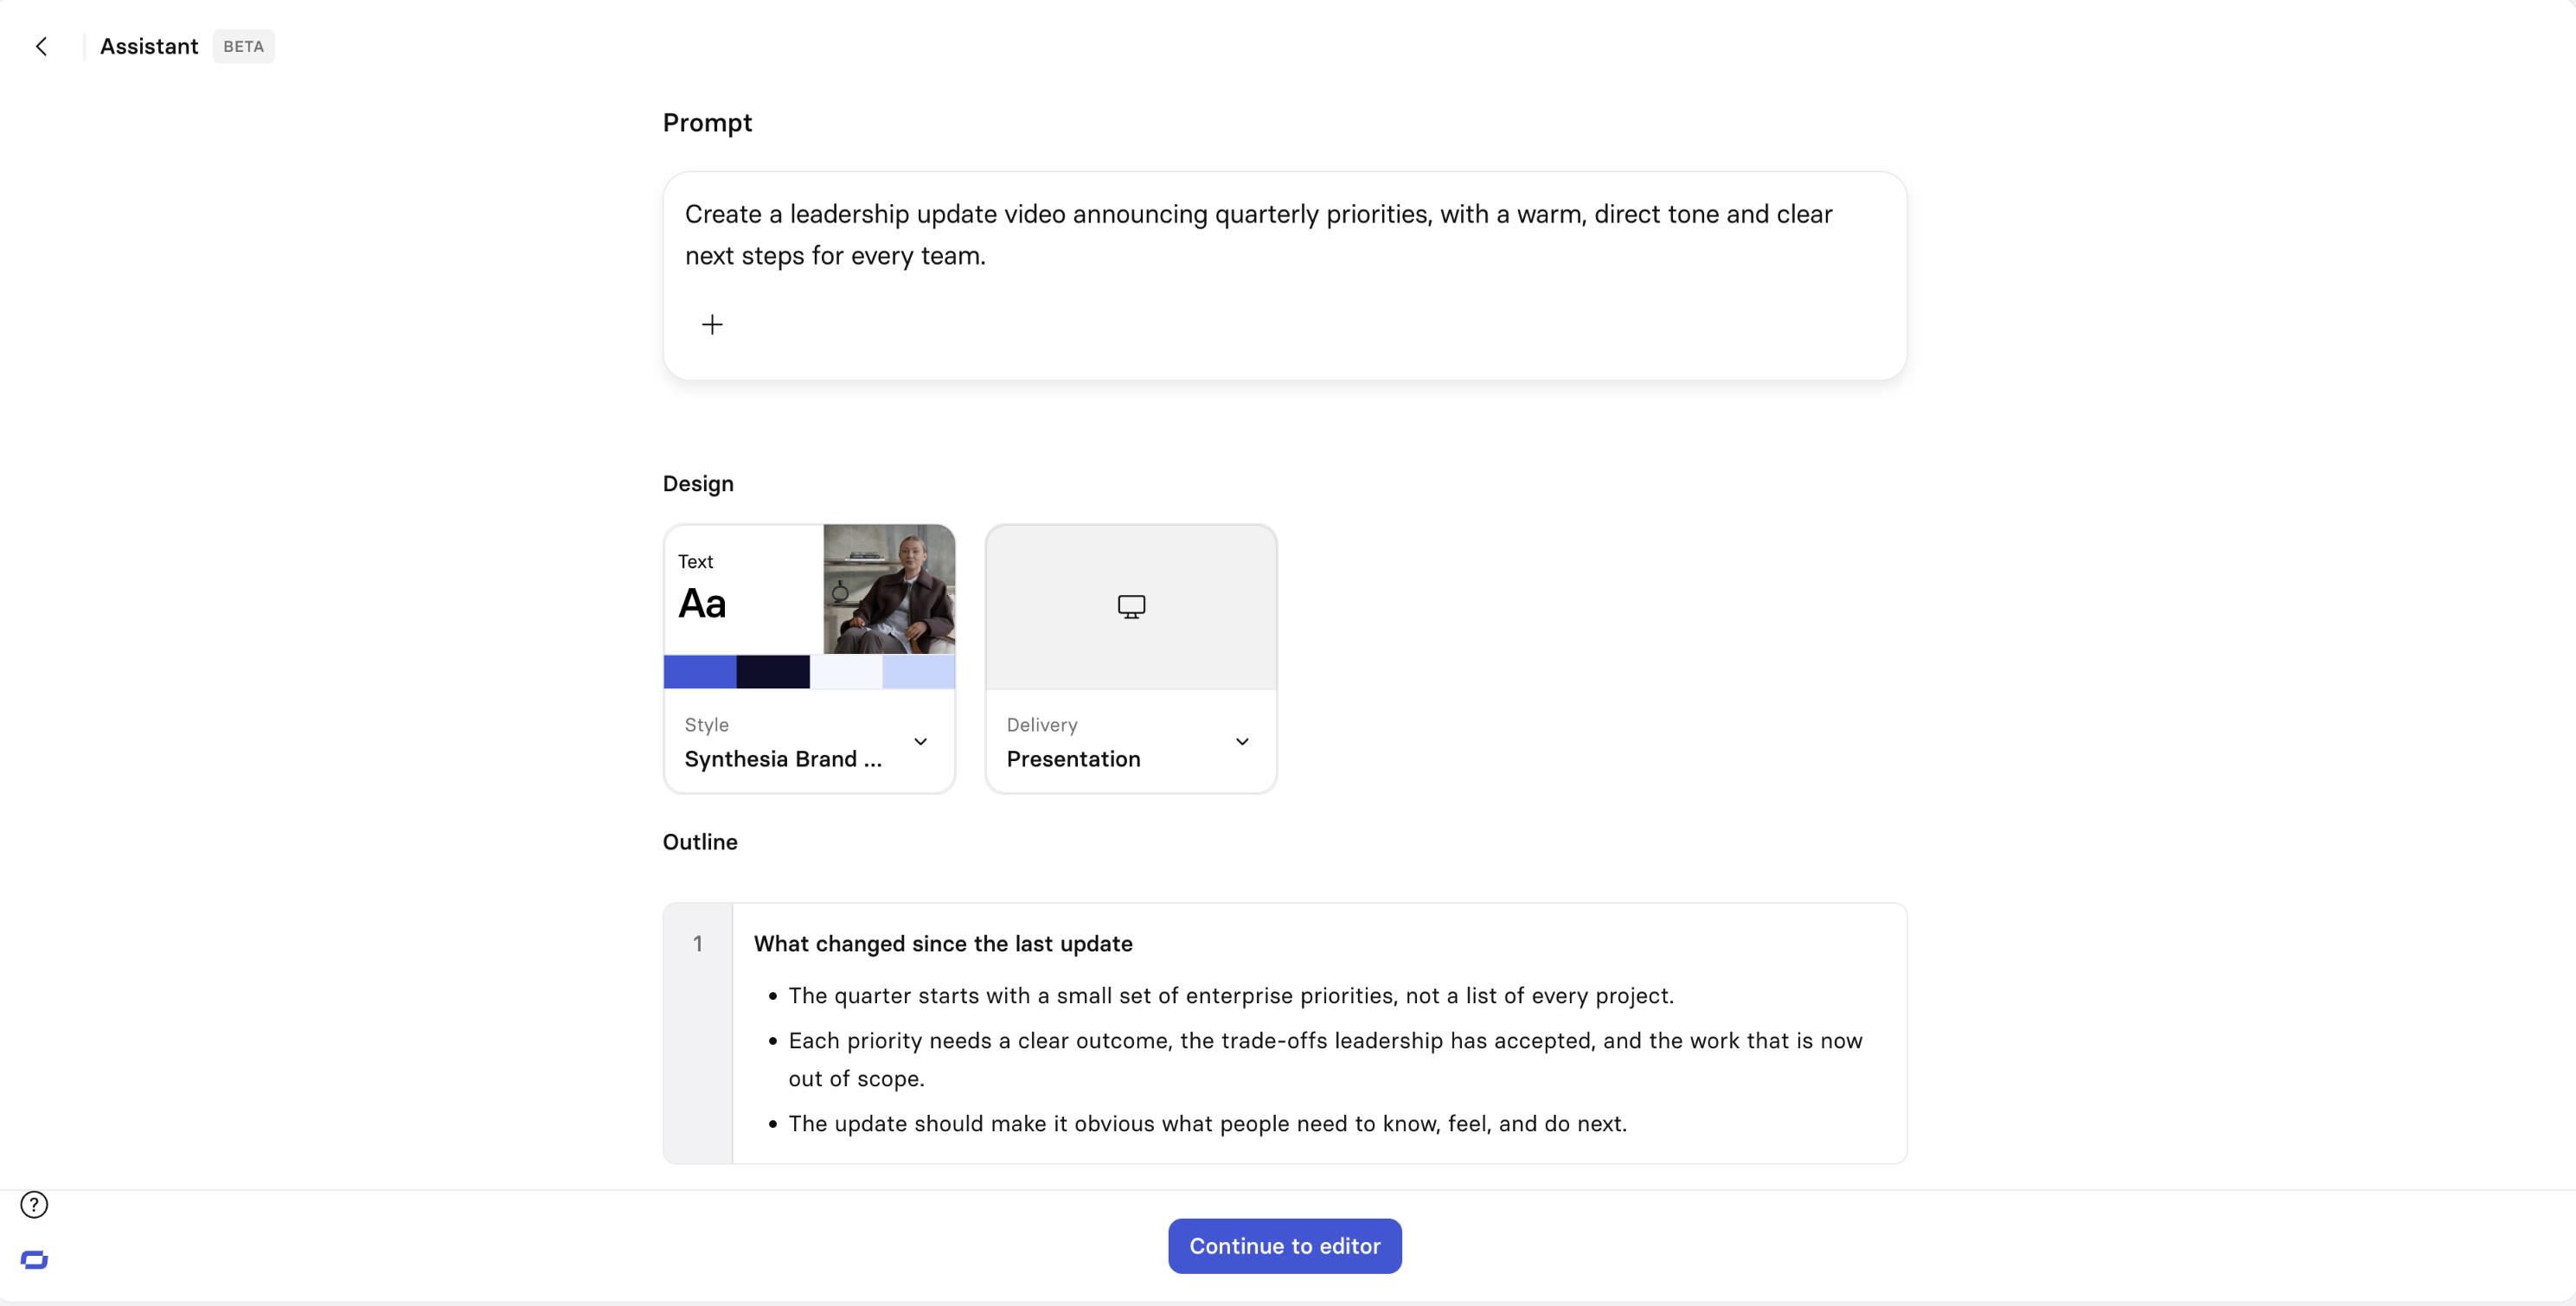
Edit any section's title or key points directly in the outline, or delete a section to remove that scene.
Alongside it, set:
- Delivery Style:
- Dynamic: shorter scenes with frequent cuts.
- Presentation: longer, denser scenes.
- Design:
From the outline, select:
- Generate video to render the video directly from the outline.
- Continue to editor to open the Storyboard view of the editor, where you can refine scenes directly or by chatting with Assistant.
Create and iterate in the Storyboard editor
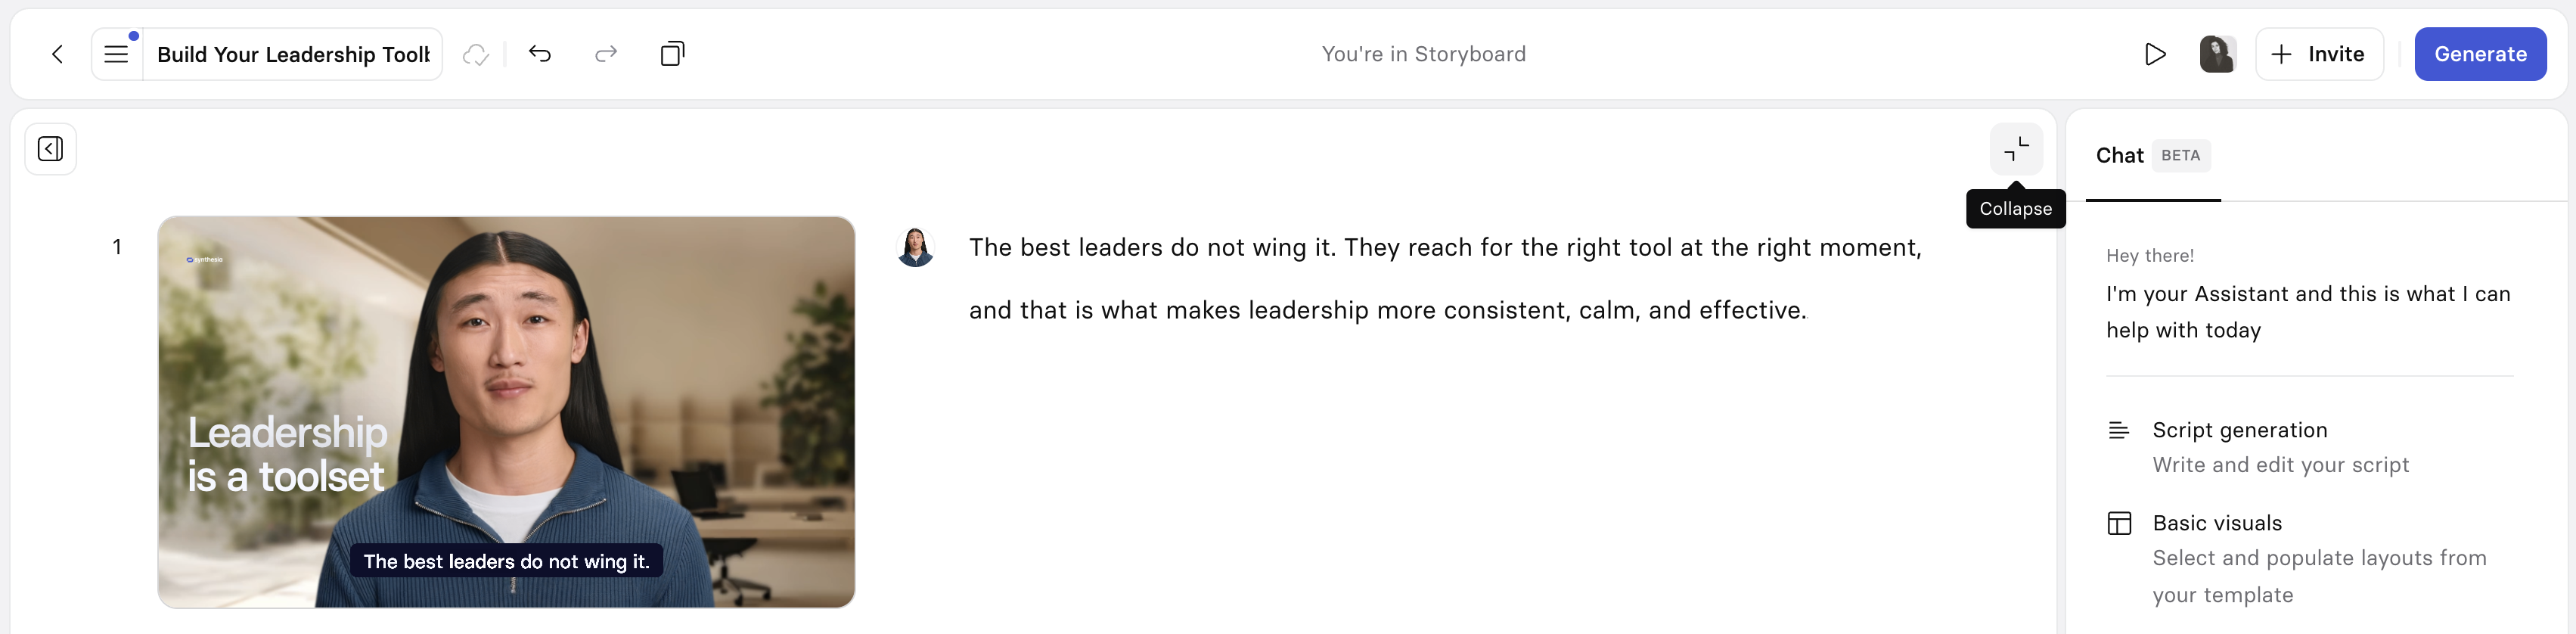
Selecting Continue to editor from the outline opens the Storyboard view:
- The Storyboard provides a macro-level, script-level view of the entire video.
- You see the visuals for each scene on the left, script in the middle, and the Assistant chat interface on the right.
- Use the chat interface on the right to refine the video. Examples of commands include:
- "Let's make this shorter"
- "Let's make this snappier"
- "Act like a VP of learning and development. What would you change about this video?"
Switch between editor views
If you need to access the traditional, micro-level Canvas editor view, click the Collapse button at the top-right of the Storyboard. This toggles between the macro-level Storyboard and the micro-level Canvas views.
Import a script
Use this when you have a script already written and want Synthesia to use it exactly as written, word-for-word, instead of generating a new one.
- From the Synthesia homepage, select
More>Import script. - Paste or type your script into the text box.
- Press
Shift + Entertwice between sections to start a new scene. A single soft return keeps the text within the same scene. - Optionally set Delivery Style, Template, and Brand kit.
- Select the submit button. Assistant creates a scene per script section and opens the result in the editor, where you can continue refining through chat.
Note:This is a separate feature from Import a script (Legacy), reached from
Create ▾ → Video → Import a file. Both use your script word-for-word, but the new-scene line break differs: this flow needs two soft returns between sections, the Legacy flow needs one.
Considerations
The following considerations apply:
- Asset generation time: Generating b-roll, motion graphics, and images can take a few minutes.
- Feature scope: Assistant focuses on script and visual creation, it is not able to edit every type of element concretely, and is not able to provide guidance about every Synthesia feature.
- Conversation persistence: Your conversations with Assistant persist and are private to you. They are not shared with other workspace members.
- No credit consumption: Assistant use does not consume credits.
- Script markers: When editing scripts that contain animations or triggers, the Assistant may move these markers. You can manually reposition them as needed.
Legacy AI Video Assistant
The AI Video Assistant generates a video from an uploaded file or a pasted script, then produces an editable outline before creating scenes.
Important:Uploading a file does not use its text as your script—Synthesia reads the file and writes a new script based on it, even if the file already contains a script or a scene-by-scene breakdown. To use your own wording exactly as written, see Import a script (Legacy) below, not Import a file.
Import a file
Use this to generate a video from source material — a document, deck, or notes. Synthesia writes a new script from the file's content; it does not carry over the original text or structure.
-
Select
Createin the top right, thenVideo, thenImport a file. -
On the
Upload filetab, upload a.ppt,.pptx,.pdf,.doc,.docx, or.txtfile. -
Select a template for the video. The template determines the scene layout of the generated video.
-
Optionally, select a brand kit to customize the template with your brand design assets.
-
Provide guidance for the assistant:
- Objective: The goal or call to action for your audience.
- Audience: Who the video is for.
- Language: The language to generate the video in.
- Speaker: Background for the avatar speaker, to guide their speaking style.
- Tone: The tone the speaker uses.
These fields are optional, but improve the starting point.
-
Select
Create outlineto generate the video's chapters and key points. Edit the video's title, description, chapter names, and chapter key points from the generated outline.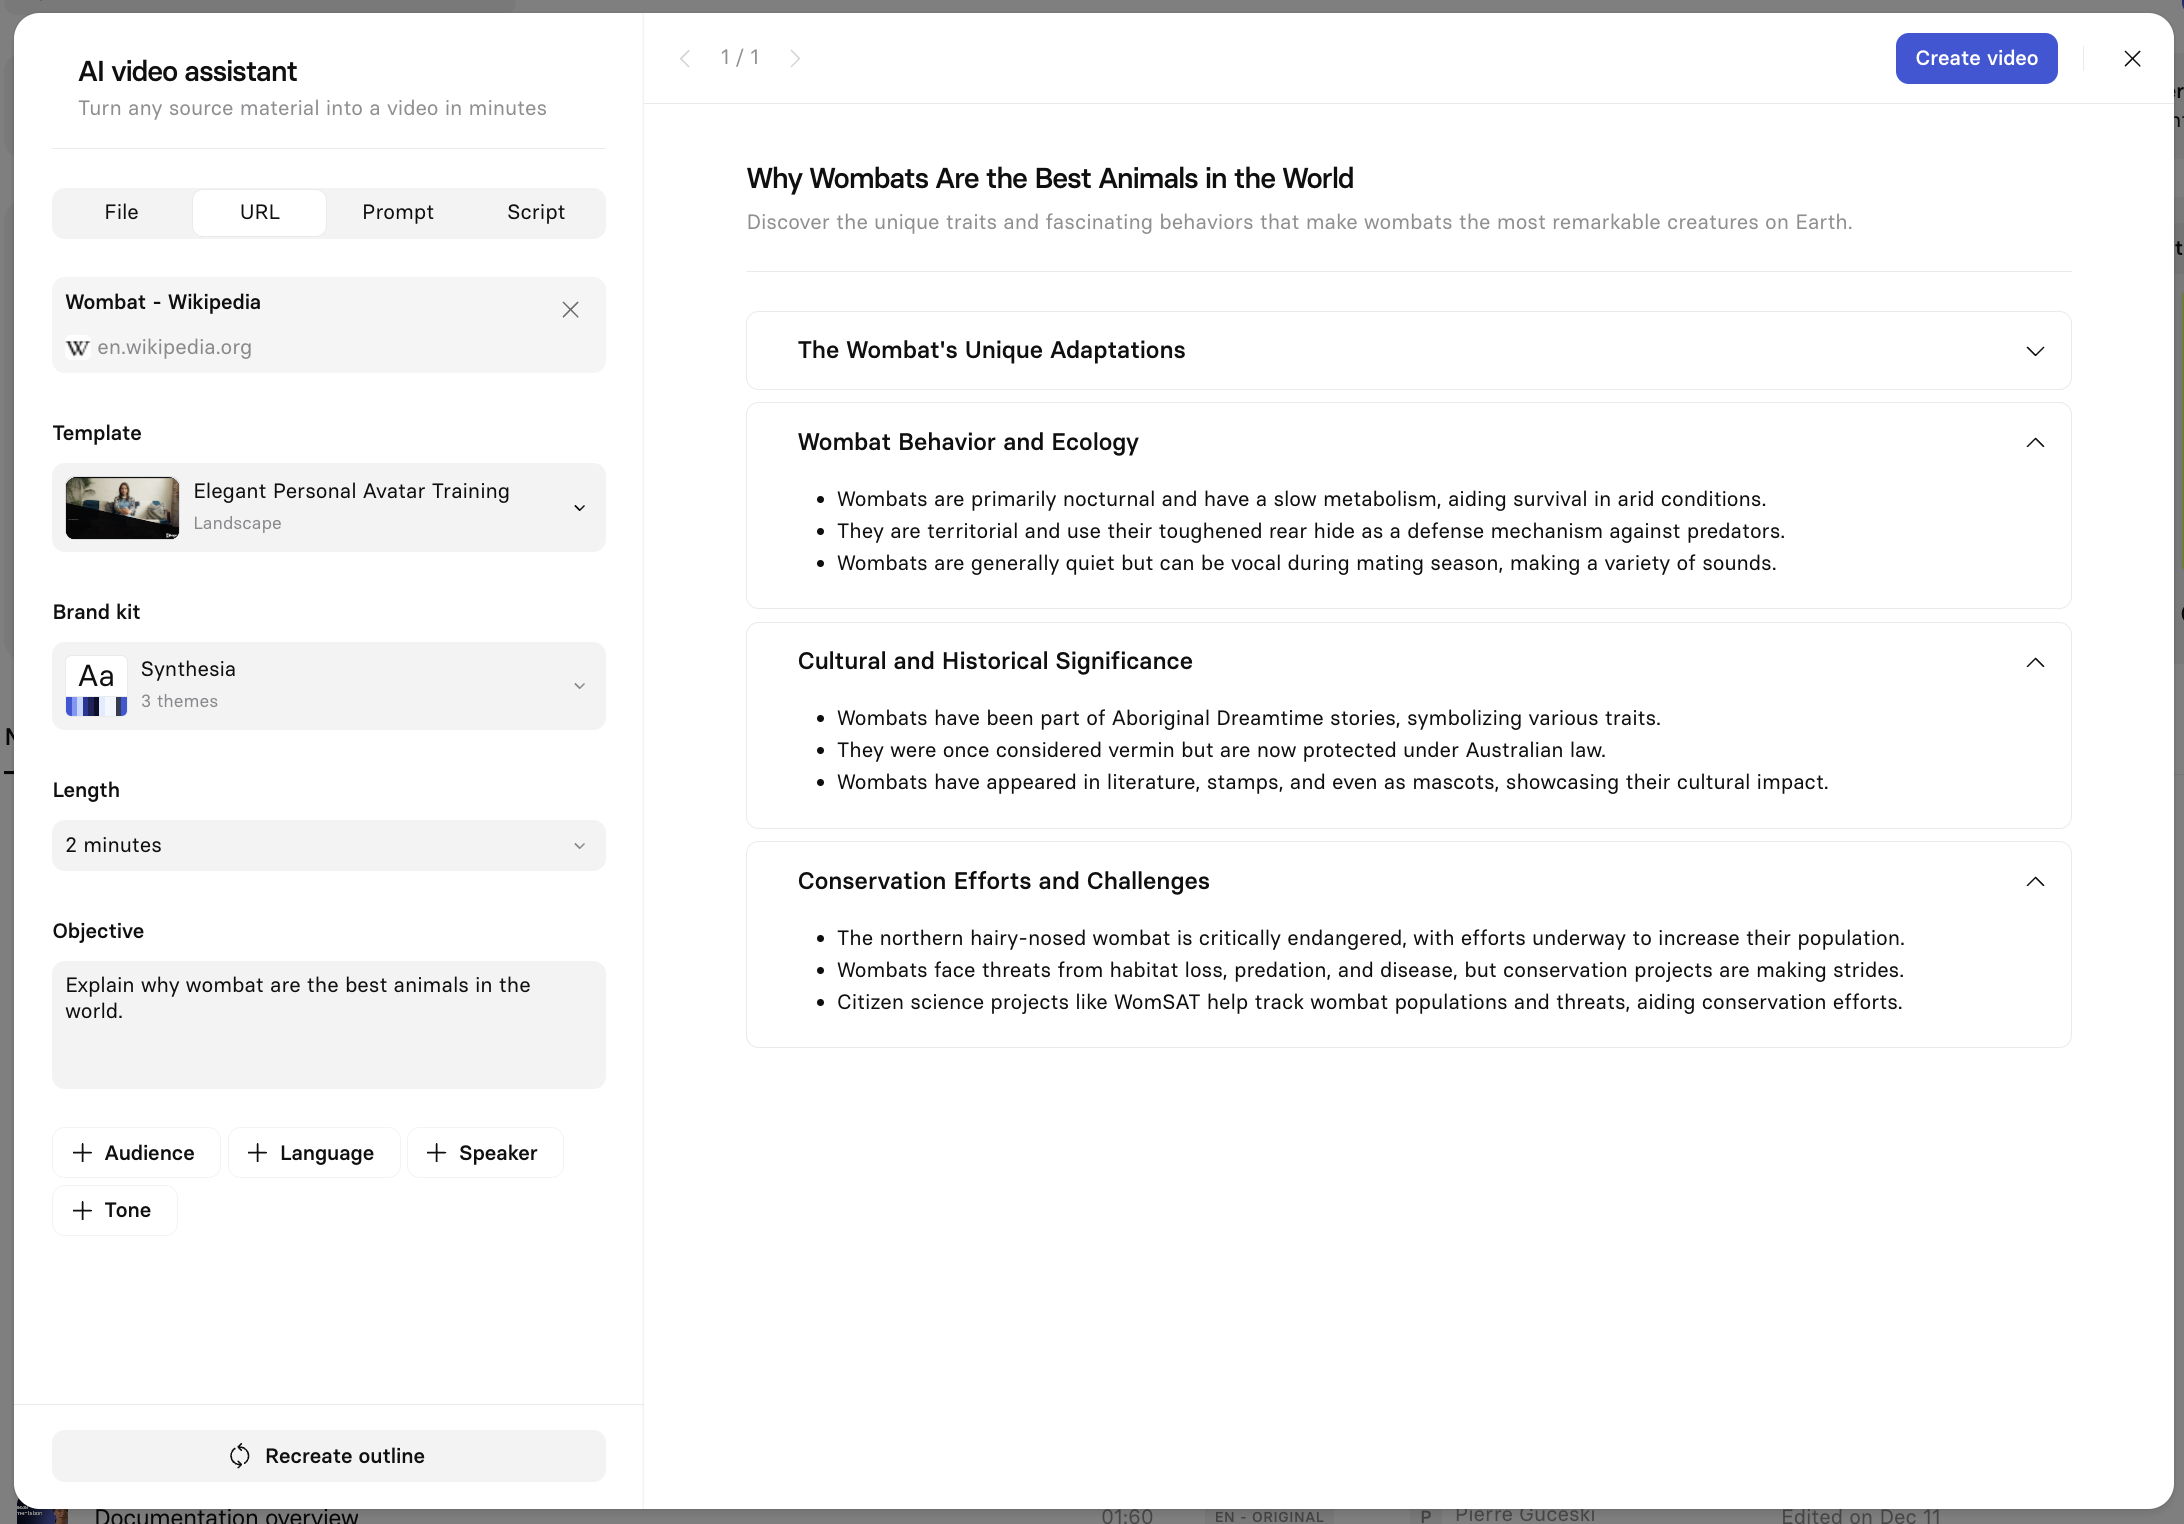
-
Optionally, select
Add chapterbetween two chapters to insert a new chapter. -
Select
Create videoto generate scene layouts and a script from the outline. -
Select
Continue in editorto edit the video's content. Alternatively, selectEdit outline, make changes, thenGenerate againto revise the outline first.
Import a script (Legacy)
Use this when you have a script already written and want Synthesia to use it exactly as written, word-for-word.
Important:Do not upload your script as a file on the Upload file tab — that generates a new script instead of using your text. Paste it on the Add script tab instead, using the steps below.
Note:This is a separate feature from Import a script above, reached from the Synthesia homepage. Both use your script word-for-word, but the new-scene line break differs: this flow needs one soft return between sections, the homepage flow needs two.
- Select
Createin the top right, thenVideo, thenImport a file. - Select the
Add scripttab. - Paste your script into the text box. Each new paragraph (one soft return) becomes a new scene.
- Select a template for the video. The template determines the scene layout of the generated video.
- Optionally, select a brand kit to customize the template with your brand design assets.
- Select
Create video.
Notes
- If a custom template is used and certain media elements shouldn't be replaced during generation, edit the template accordingly. For each of the media elements in the template that should not be replaced, select the element, head to the Inspector Panel on the right (Design tab) and select the three-dot icon in the Image/Video section. From there, you can adjust the Replace with AI setting to Auto, Always, or Never.
- The AI Video Assistant is powered by OpenAI. Only prompts are transferred, and OpenAI doesn't use this data to train its models.
- Synthesia retains prompts for abuse and misuse monitoring for a maximum of 30 days, then automatically deletes them unless otherwise required by law. See the Synthesia Legal hub for details on data processing and privacy.
Updated 5 days ago