Elements
Add Avatars, backgrounds, images, videos, text, and shapes to your scenes.
Element types
You're able to dd the following elements to the canvas:

Elements section of the toolbar
| Element | Description |
|---|---|
| Avatar | Search for and add a stock avatar from Synthesia's library, or one of your own custom avatars (e.g. a Studio or Personal avatar). All the avatars available for use with your account will be visible from the Avatars page in your library. |
| Text | Text elements. |
| Shape | Squares, arrows, circles...and more! |
| Motion | Add motion graphic elements to your video. |
| Media | Images, videos, animated GIFs, icons, Lottie animations, and logos. |
| Captions | Add stylized dynamic captions to your video. |
| Interactivity | Add buttons, quizzes, menus, and branching paths to your videos. |
| Record | Add a screen recording to your scene. |
Element settings
Some settings apply to all types of elements, and each type of element has its own respective settings. Selecting an element in the canvas will reveal its unique settings in the inspector panel.
Lock and unlock elements
Locking an element prevents the element from being moved, resized or rotated on the canvas.
To lock an element:
- Select the element on the scene.
- Once selected, right-click the element and select Lock from the menu drop down.
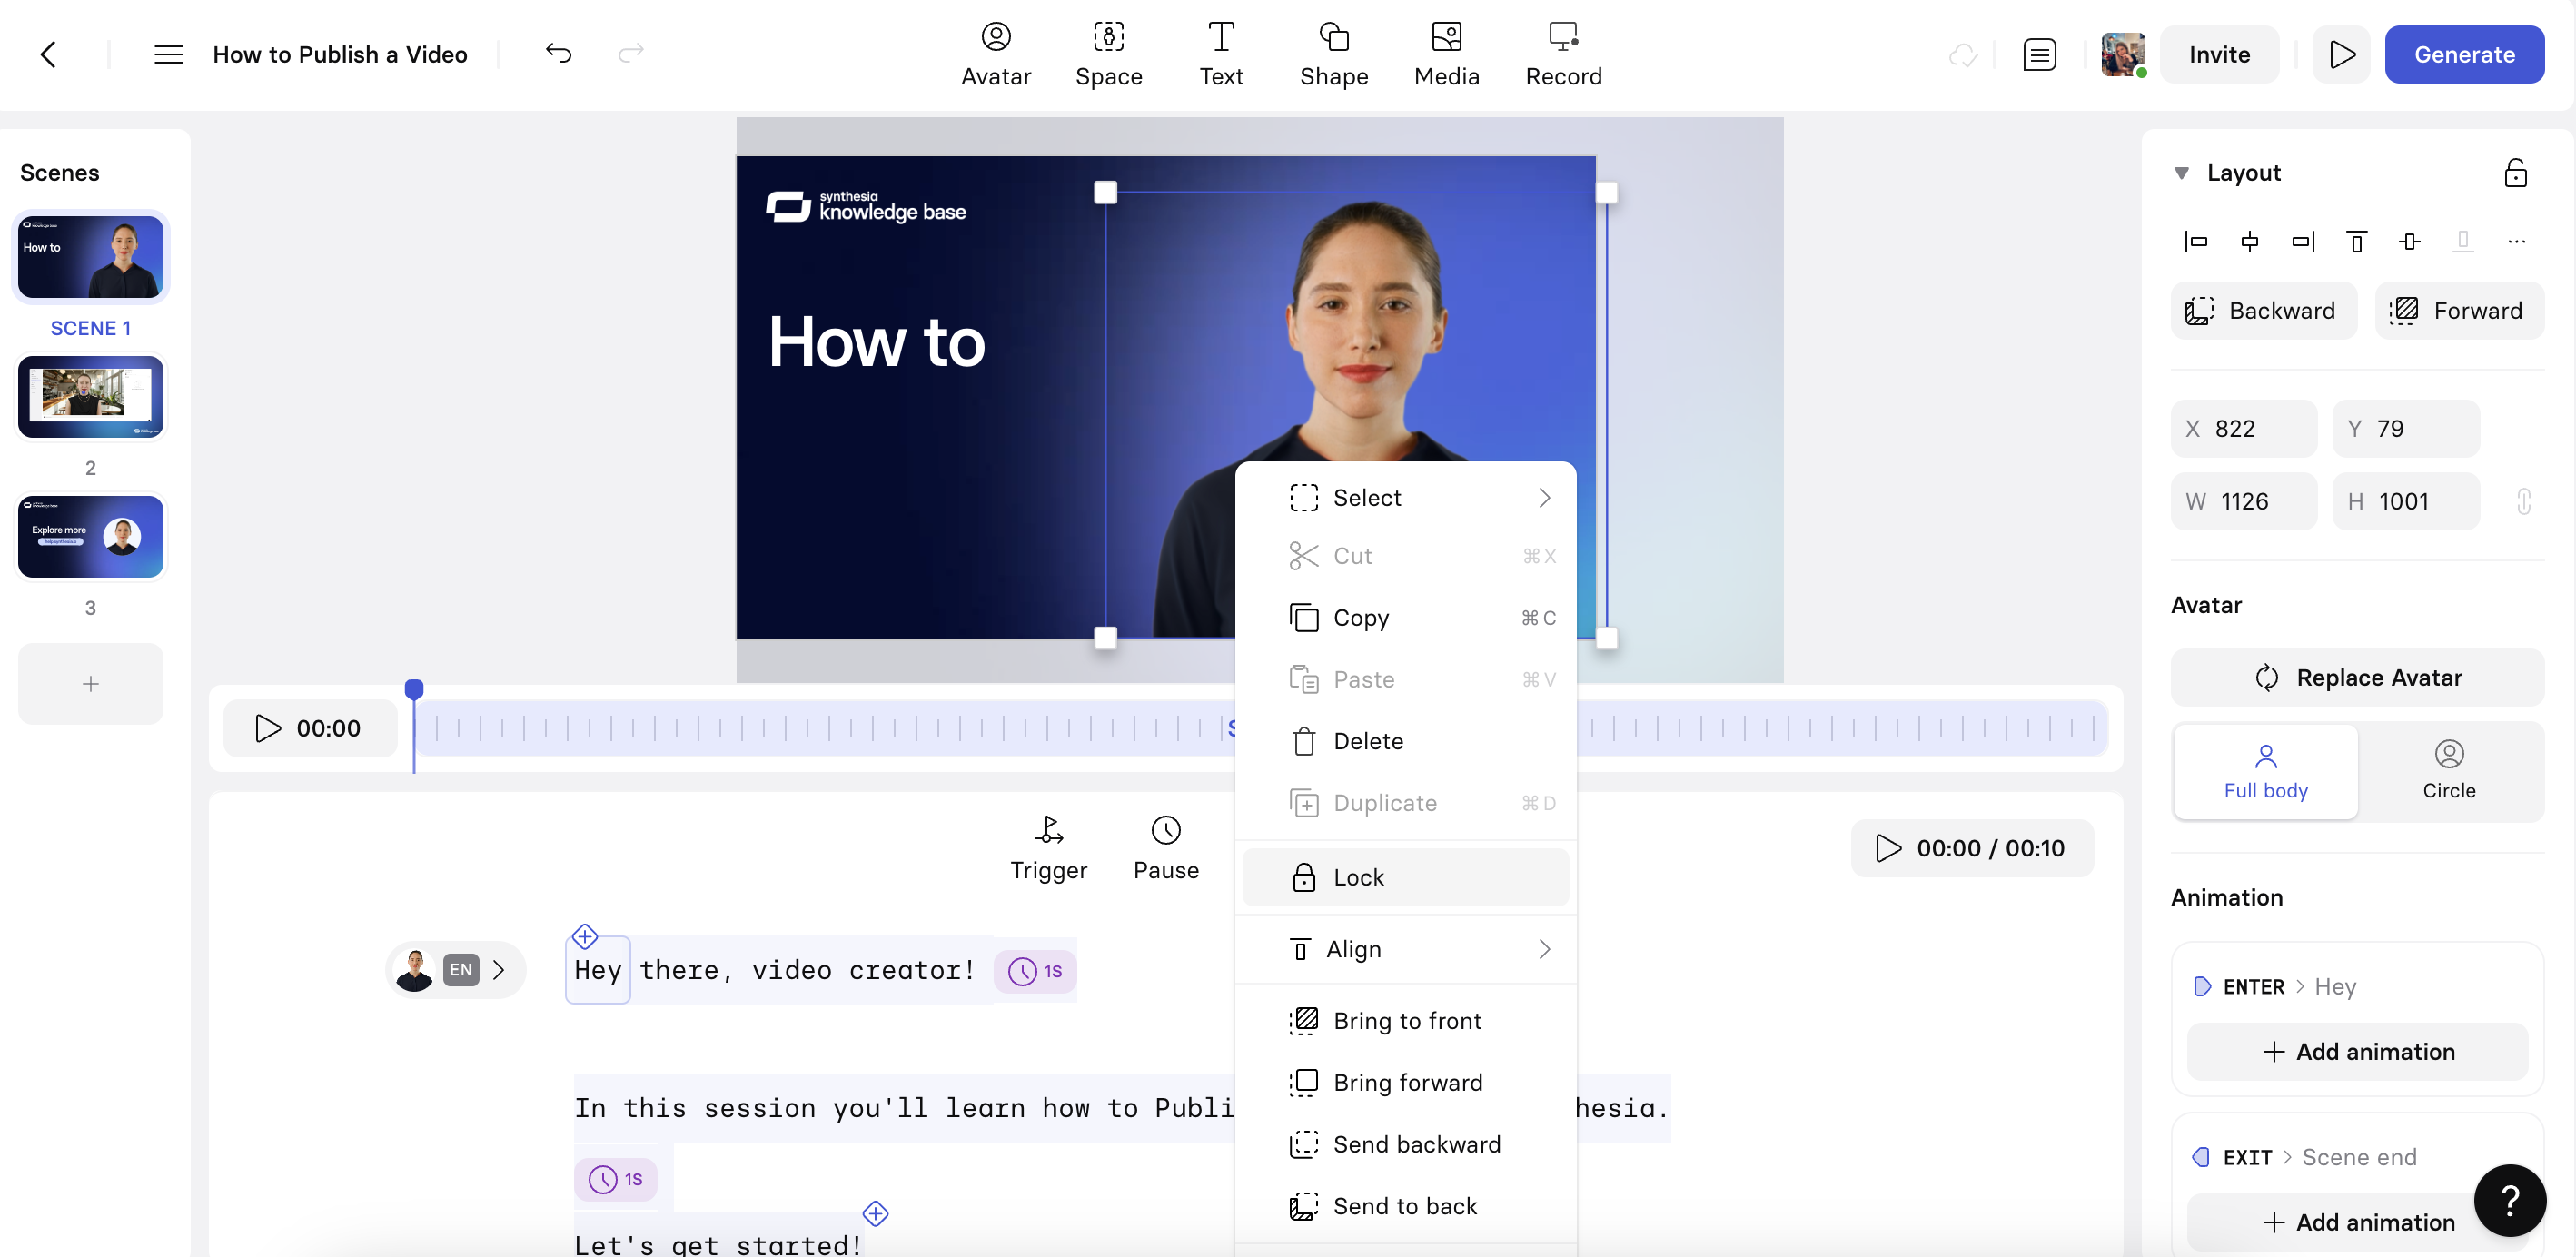
Locking an element
To unlock an element:
- Select a locked element on the scene.
- Once selected, right-click the element and select Unlock from the menu drop down.
Selecting elements
Selecting an element
- To select a single element, click on it.
- To select multiple elements, hold down the
Shiftkey click on each element you'd like to select. - To select all elements, click anywhere on the canvas and press
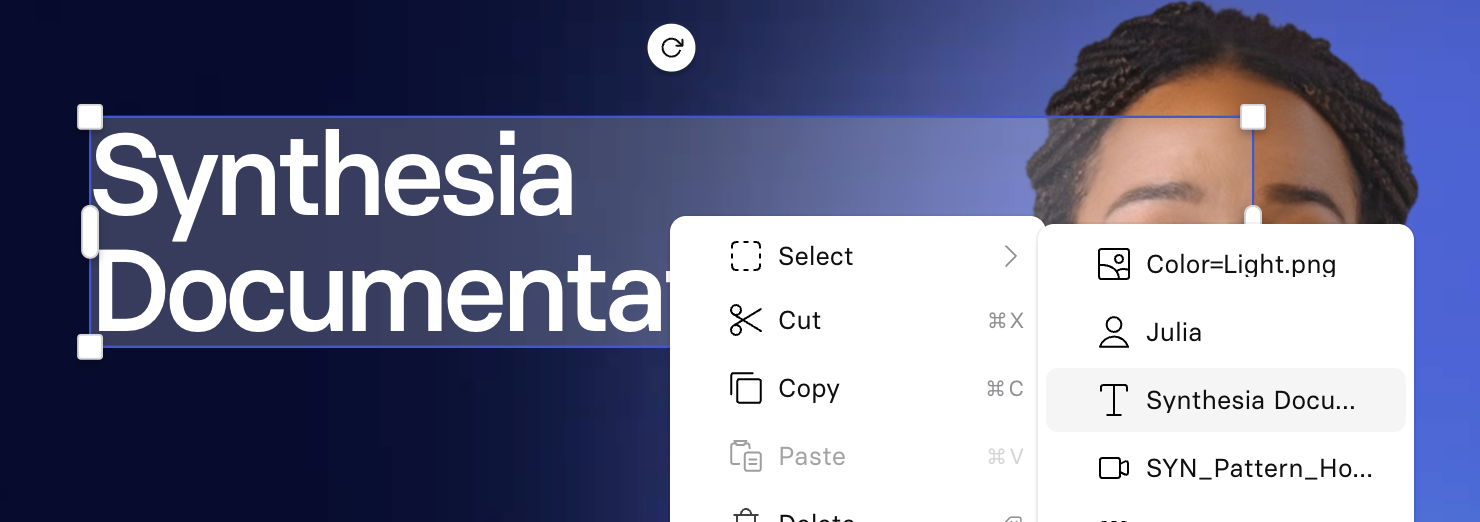
⌘+a(Mac) /Ctrl+a(PC). - To select a specific element when multiple elements overlap:
- Right-click anywhere on the canvas.
- Click on the
Selectoption at the top of the menu. - Hover any element from the list of elements displayed to highlight it on the scene.
- Click on an element from the list to select it.
Note:The elements in the list will be displayed in the order that they are layered in the canvas. The first list will be the top-most element in the foreground, and the last item will be the element that's the furthest in the background.
Animations and effects
Apply animations and effects to avatars and text, media, and shape elements.
Animating an element
Animations and effects can be added and edited from the Script box, inspector panel, and from the Timeline.Use triggers in the Script view, or from the inspector panel, when you want a quick, voice-synced way to manage animations and effects. Just drag entrance, exit, or effect triggers onto specific words in your script. The animation will automatically sync with the timing of that word in the voiceover—no manual adjustments needed.
Use the Timeline when you need more granular control over timing, visual sequences, or scene elements that don’t have script-based triggers. The Timeline gives you full visibility into all scene layers and lets you fine-tune start times, durations, and effects independent of the script.
Animations
Depending on the animation selected, some of the following settings can be adjusted:
- Direction: The direction of the canvas that the element should enter or exit from.
- Velocity: The velocity to give to the element, to choose between bounce, smooth, and linear.
- Duration: Time taken for the animation to complete in seconds.
- Delay: Time to wait between the trigger and the beginning of the animation in seconds.
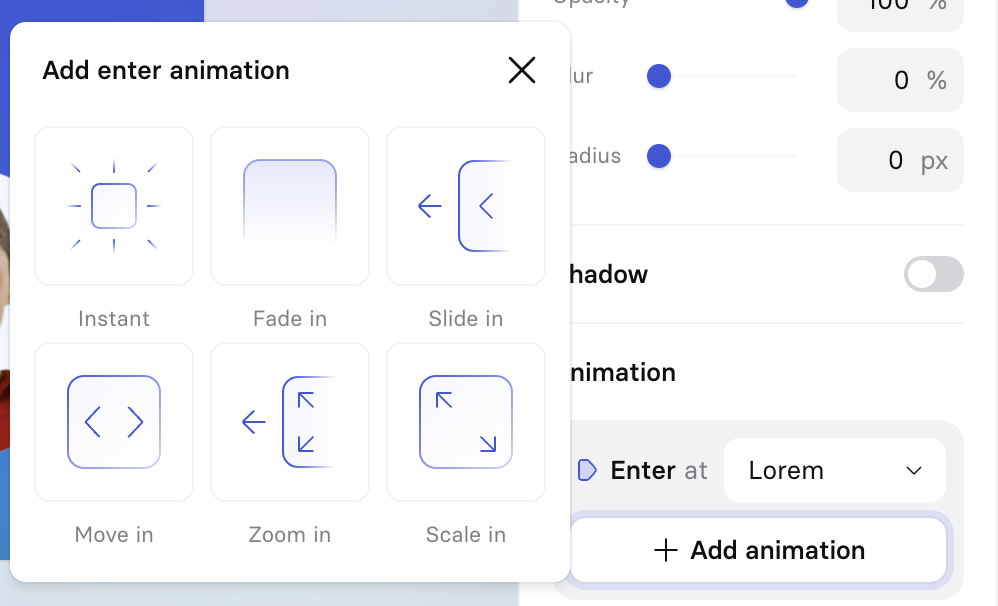
Entrance animations
Entrance animations can be applied to any media, text, shapes, and avatars.
- Instant: Instantly displays the element(s).
- Fade in: Gradually brings the element(s) into view.
- Slide in: Slides the element(s) in from the left/right/top/bottom.
- Zoom in: Gradually zooms in the element(s) while fading in.
- Scale in: Gradually scales the element(s) to its final size.
Exit animations
Exit animations can be applied to any media, text, shapes, and avatars.
- Instant: Instantly removes the element(s).
- Fade out: Gradually removes the element(s) from the view.
- Slide out: Slides the element(s) out from the left/right/top/bottom.
- Zoom out: Gradually zooms out the element(s) while fading out.
- Scale out: Gradually scales down the element(s).
Effects
Emphasis effects
Emphasis effects are available for all canvas elements. These effects help draw the viewer's attention to any visual element on the canvas when a particular word is said in the script.
- Blink: The element disappears and reappears a set number of times.
- Available settings: number of blinks and blinking speed.
- Shake: The element shakes from left to right several times.
- Available settings: intensity and speed of shaking.
- Pop: Enlarges the element to a set size, then scales the element back down to its original size.
- Available settings: speed and size to enlarge to (from 101 - 200%).
Avatar effects
- Swap shot: Seamlessly switch an avatar's camera angle or zoom in the middle of a scene.
Note:The swap shot effect can only be applied to avatars with multiple camera angles available. Multi-cam avatars are indicated with a camera icon in the bottom-left of the avatar thumbnail:
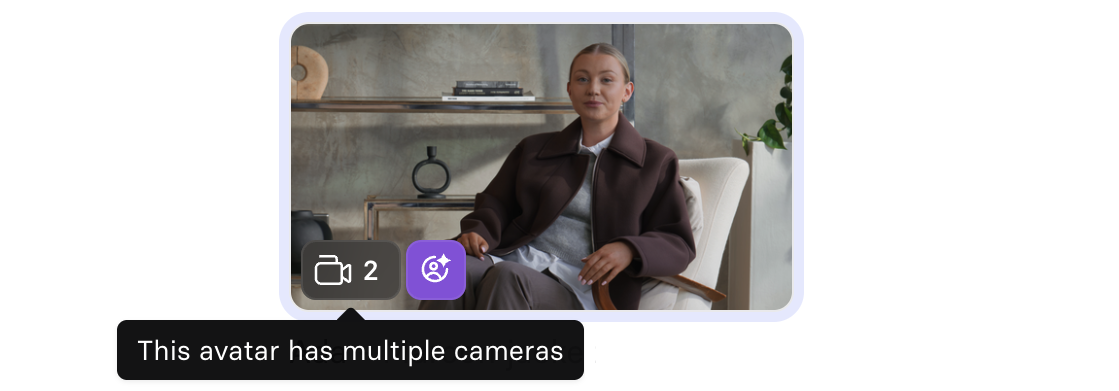
Image effects
Camera Zoom:
Zoom into and out of specific areas of an image, or pan to a different area of an image.
- Adjust zoom level, position, and speed of zoom.
- When using a zoom effect, you can specify a zoom out point to return to the original zoom level by selecting Add Zoom Out. Multiple zoom in/out effects can be chained together.
Note:Image effects cannot be applied to an image that has been set as the background of a scene. Detach the image from the background to apply effects to it.
Video effects
Zoom/Pan:
Zoom into and out of specific areas of a video, or pan to a different area of a video.
- Configure zoom level, position, and speed of zoom.
- Use the scrubbing tool to choose a frame.
- When using a zoom effect, you can specify a zoom out point to return to the original zoom level by selecting Add Zoom Out. Multiple zoom in/out effects can be chained together.
Play/Pause:
Define which video frame appears at specific words in your script, and whether the video should play or pause at that moment.
- Use the scrubbing tool to choose a frame.
- Videos will remain paused until reaching a trigger for the Play Effect.
Note:
- Video effects cannot be applied to a video that has been set as the background of a scene. Detach the video from the background to apply effects to it.
- Video effects cannot be applied to a video if the video's playback mode is set to
Play once. To add a video effect to a video, the playback mode must be set to eitherStretchorLoop/Cut.
Triggers
Triggers allow you to trigger when an animation or effect should start. After selecting an element and setting an animation or effect for it, use the little blue icon in the script to move the trigger to the right word.
Alternatively if you have a long script, select a word for the trigger from the inspector panel. All words with an existing trigger attached are displayed, if you want to add a new one, click on + New trigger, then click on the corresponding word in your script.
See How do I use Animation Triggers? in order to see this feature in action.
Updated about 2 months ago