Create an Avatar
Create a digital twin that talks and looks just like you to use in your Synthesia videos.
You can create a Personal Avatar in multiple ways, depending on how you want to capture your likeness.
When you click + Create avatar on the Avatars page, you’ll see the following creation options:
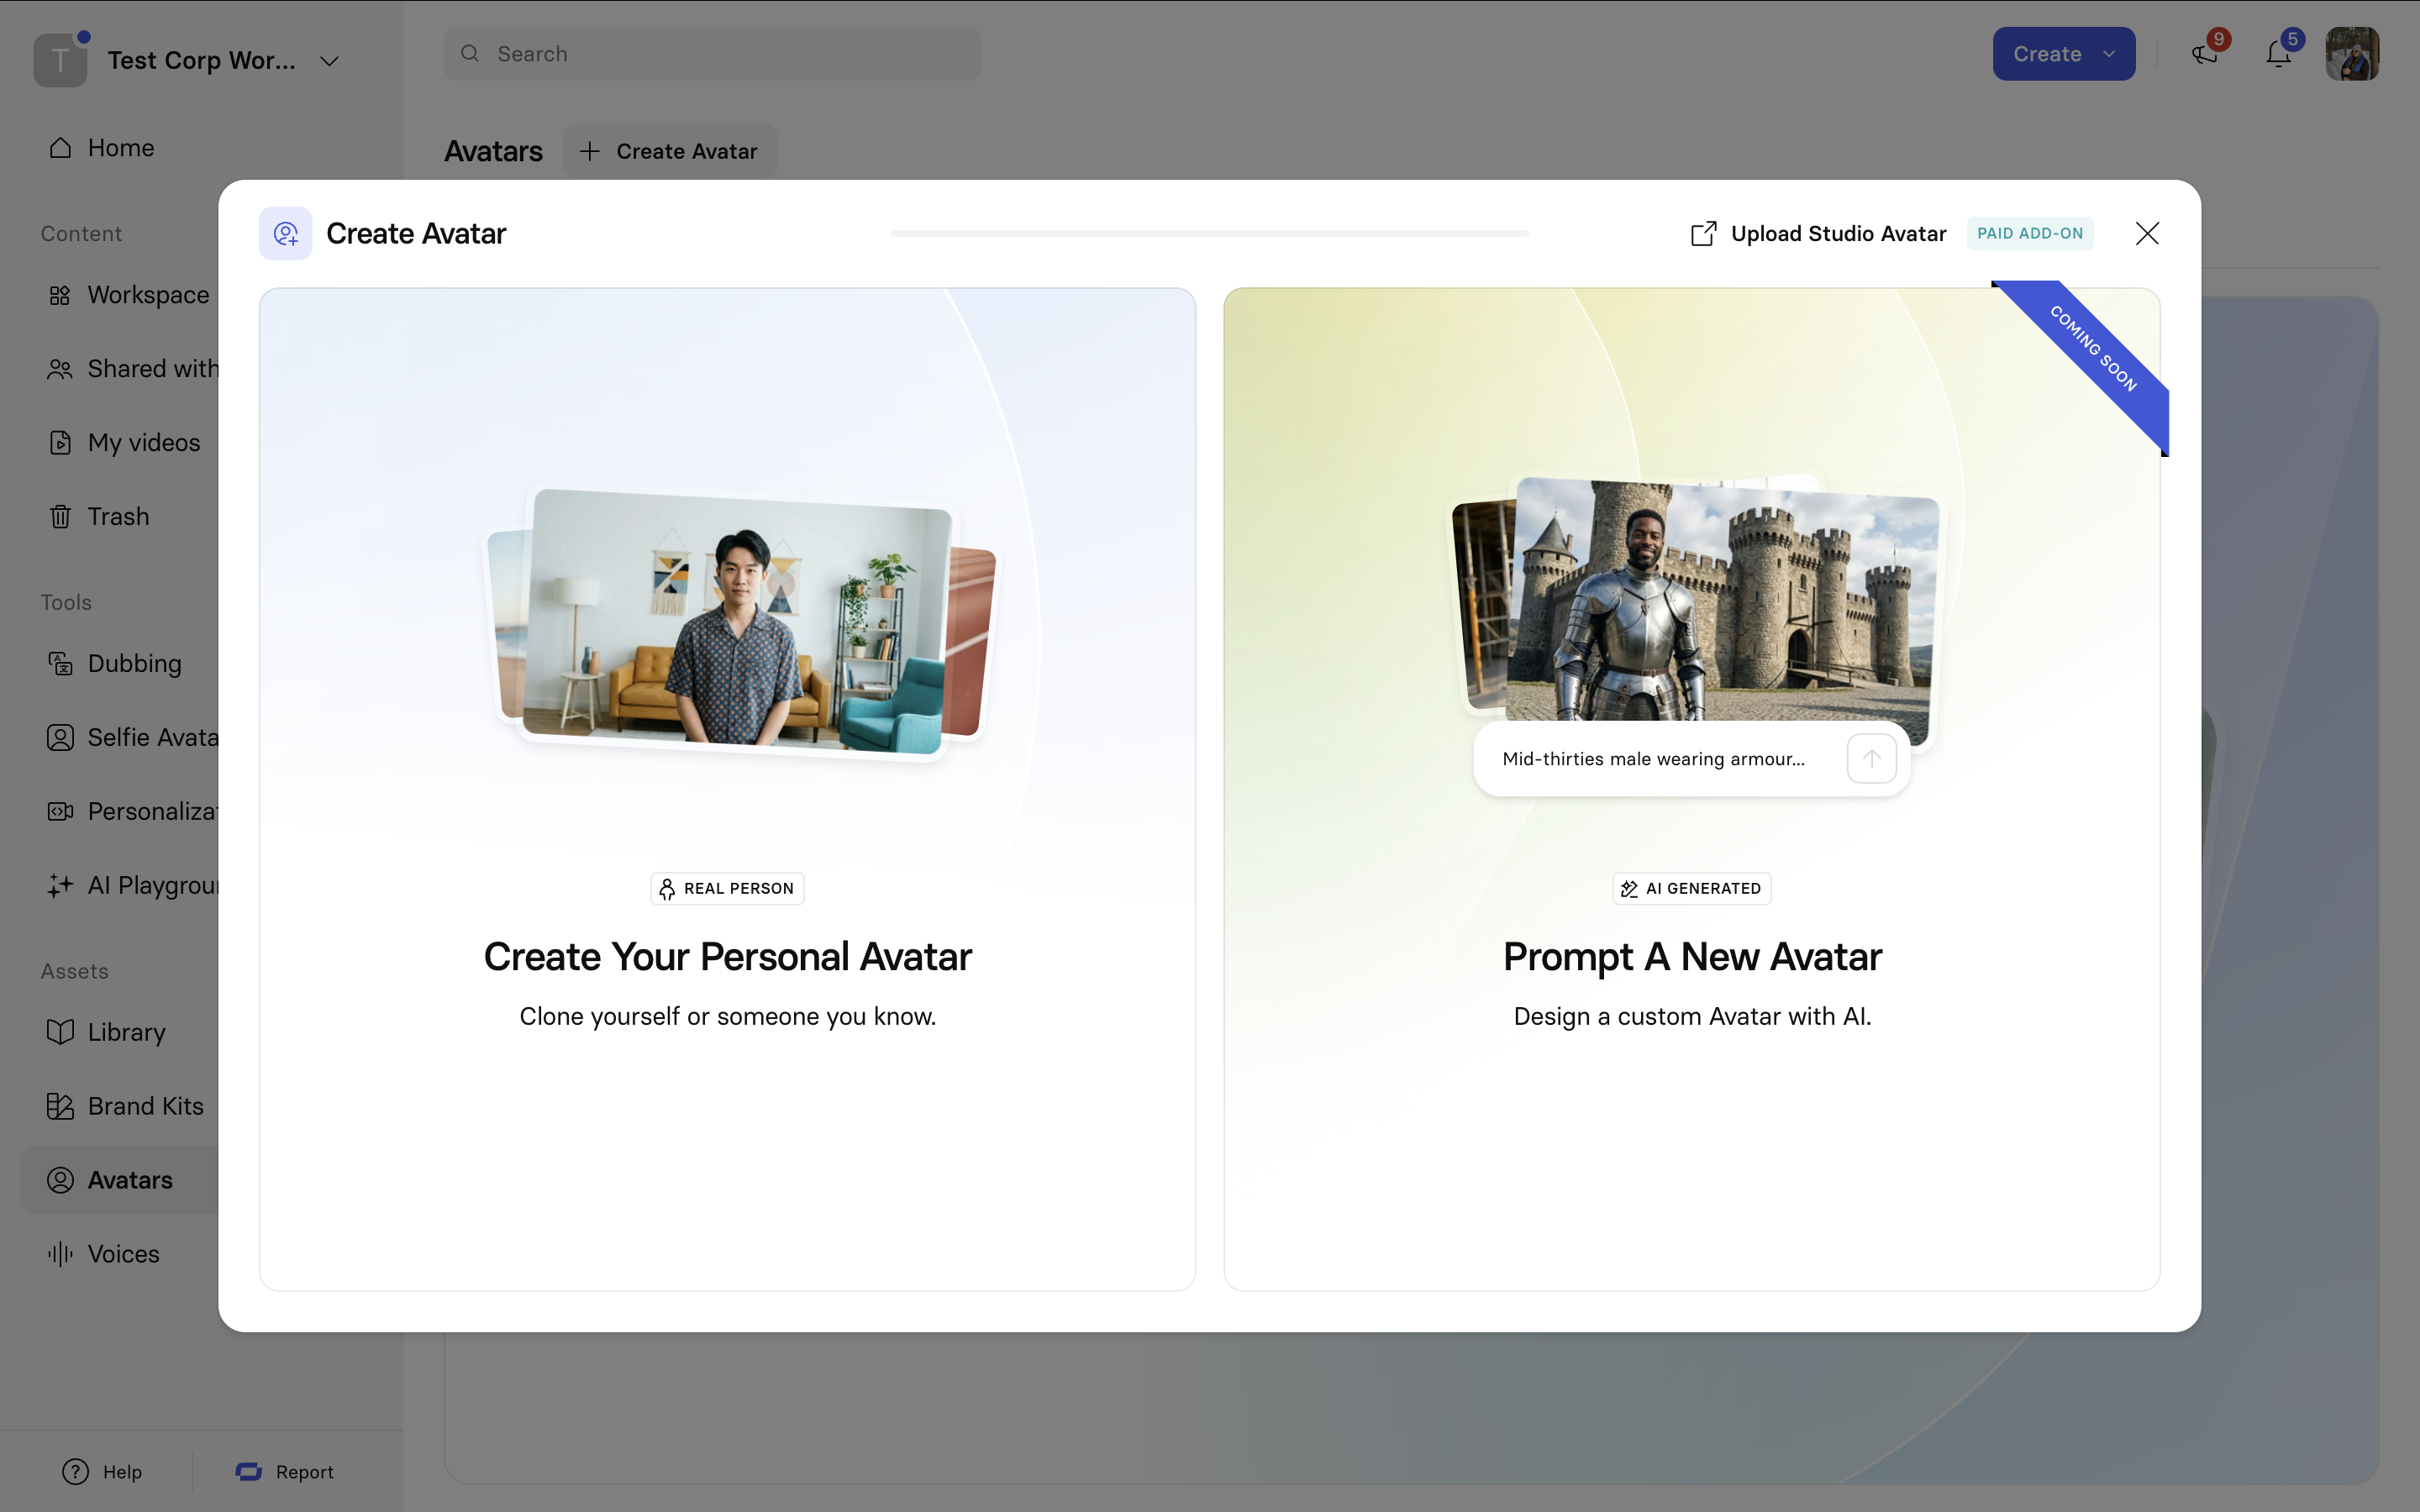
Create Your Personal Avatar – Clone yourself or someone you know.
Coming soonPrompt A New Avatar – Design a custom Avatar with AI.
Upload studio footage (paid add-on) – Use professional green screen footage to create a custom avatar.
Create Personal Avatar
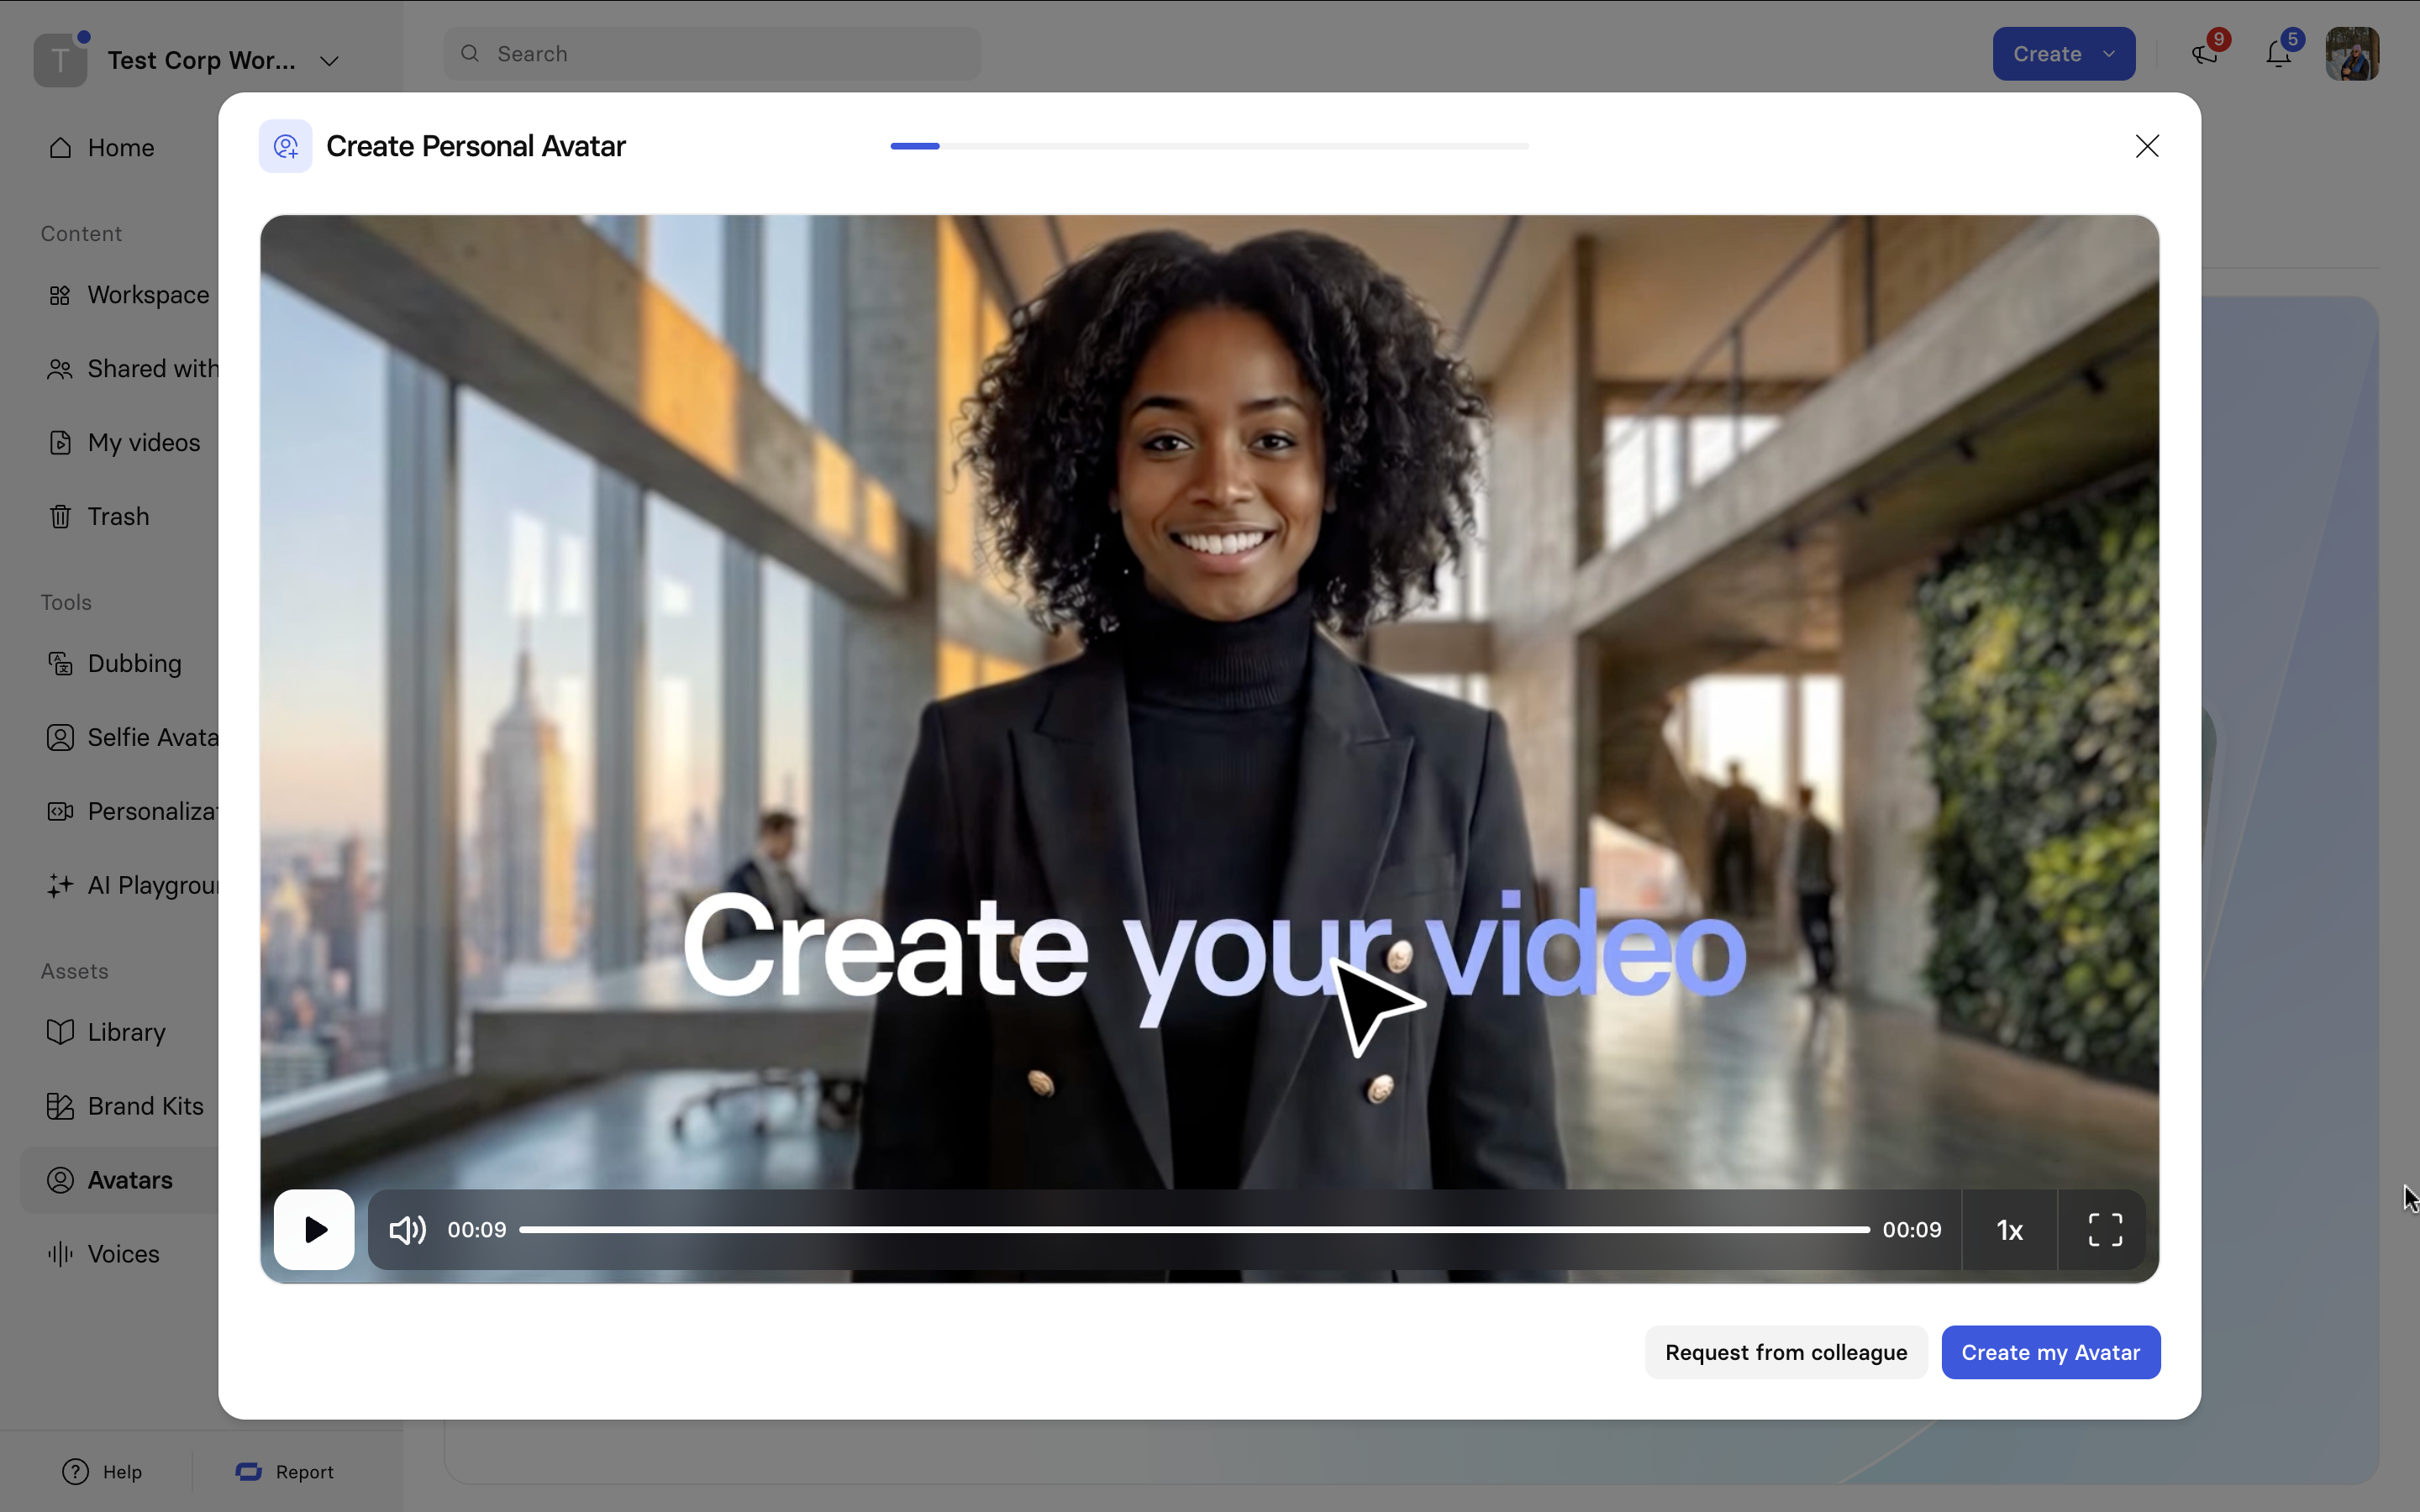
Request an avatar – Create a Personal avatar for someone without a Synthesia account.
Create my Avatar – Clone yourself.
Create my Avatar
Upload a photo – Create a Personal Avatar from a single image. No filming required.
Record a video – Upload an existing video or record yourself using your webcam to capture your natural motion.
Personal Avatars from photo
Personal Avatars from photo are generated from a single photo and stored as a reusable avatar. The avatar can be added to videos and customized with different outfits, backgrounds, and avatar B-roll, without any video recording.
They are built using Synthesia’s Express-2 technology, the same foundation used by our latest stock avatars.
Personal Avatars from photo are available on paid plans only.
Create a Personal Avatar from photo
To create a Personal Avatar from photo:
- Go to the Avatars page and click
+ Create avatar. - Upload a photo of yourself or capture one using your webcam.
- (Optional) Record or upload a voice sample to clone your voice.
If skipped, the avatar will use a Synthesia voice. - Record and submit the consent video when prompted.
- Submit your request.
Avatars are typically ready within minutes after the consent step is completed.
Photo requirements
Use a clear, well-lit photo of a single person. The subject should be fully visible, with no obstructions or heavy shadows.
The photo should ideally be framed from the waist up and captured against a neutral, uncluttered background.
For best lip-sync results, choose a photo where your teeth are visible. This helps improve mouth shape estimation during speech animation.
Photo quality directly affects how realistic the avatar looks and moves.
Avatar motion and lip-sync behavior
Personal Avatars from photo use a speech-driven animation model rather than motion learned from recorded footage.
- Lip sync and facial expressions are generated from the spoken content.
- Body language is neutral and designed to match the script’s pacing and emphasis.
Because movement is not learned from a real performance, the avatar’s motion will not exactly match how you move in real life. Perceived expressiveness depends on the script and scene framing.
Lip sync performs best when the avatar is framed closer in the scene rather than positioned far from the camera
Voice and language support
Personal Avatars from photo can be used with either:
- A cloned version of your own voice (optional), or
- Any supported Synthesia voice
If voice cloning is enabled:
- You’ll be prompted to provide a voice sample during creation
- The cloned voice can be used across multiple languages, depending on plan and availability
If voice cloning is skipped, the avatar will default to a Synthesia voice and can be changed in the editor at any time.
Using your Personal Avatar from photo
Once the avatar is ready, it can be used like any other avatar:
- Open a video project.
- Select Avatars from the media panel.
- Choose your Personal Avatar from photo.
- Add it to the scene and generate the video.
Customization and B-roll generation
Personal Avatars from photo support the same customization capabilities as Synthesia’s synthetic customizable avatars, including:
- Outfit changes
- Background changes
- Action-based avatar B-roll
To update the avatar’s appearance or generate B-roll footage, follow the same workflow used for customizable avatars.
Consent, ownership, and sharing
Creating a Personal Avatar from photo requires a live consent recording to verify identity and authorization.
Consent videos must be recorded live and cannot be uploaded. The person in the consent video must be the same individual shown in the uploaded photo.
Custom Outfits and Spaces can be shared with individual users or your entire workspace. Recipients can use the personal avatars in the specific shared outfit but cannot edit them or create new custom outfits with the personal avatar from photo.
Voice is not included when sharing a Personal Avatar from Photo and must be shared separately.
Learn more: How do I share a custom outfit or space?
Personal Avatars from video (recorded or uploaded)
Personal Avatars from video are animated using an advanced form of looping technology called auto-alignment, which understands the difference between when an avatar is talking and when it is silent, and coordinates the body movements in a way that is more responsive to the content of the script.
We’ve reused the same technology powering our Expressive Avatars to achieve better lip-sync and a more natural voice compared to other custom AI avatars.
Personal Avatars also come paired with your cloned voice which allows your avatar to communicate in over 30 languages.
Voice isolationWhen recording or uploading footage for your Personal Avatar, Synthesia isolates your voice and removes background noise in order to ensure optimal voice quality.
To create a Personal Avatars from video
- Add footage of yourself that will be used to generate your avatar in one of two ways:
- Record a consent video to acknowledge that Synthesia has the right to create your personal avatar
- Submit your recording, and your avatar will be ready in 24 hours
The consent video must be recorded live, and it must be the same person in the Personal Avatar creation footage.You cannot upload a pre-recorded consent video; it must be recorded live, even when uploading pre-recorded footage to create your Personal Avatar.
Supported languages
The supported languages for recording yourself are:
Arabic, Bulgarian, Croatian, Czech, Danish, Dutch, English, Filipino, Finnish, French, German, Greek, Hindi, Hungarian, Indonesian, Italian, Japanese, Korean, Malay, Mandarin (Simplified/Traditional), Norwegian, Polish, Portuguese, Romanian, Russian, Slovak, Spanish, Swedish, Tamil, Turkish, Ukrainian, Vietnamese.
Whether you record yourself in-app or upload pre-recorded footage, you'll be prompted to choose a default language for your Personal Avatar. Your voice will be cloned during the Personal Avatar creation process, and you'll be able to use your Personal Avatar in any of the supported languages listed above.
Record yourself in-app
Before you get started, read the personal avatar guidelines to make sure you get the best results!
To record in-app:
-
Click on
+ Create avatarin the -
Select
Record a video. -
Watch the overview video with the best practice then click
Next -
Select
Record yourself -
Review the setup instructions
-
Select the language, camera, and microphone to use while recording

-
Click
Start recordingand read the script displayed in the language you have selected -
Optional: Remove the background from your Personal Avatar (this will make the background transparent)
-
Record your consent footage.
-
Submit your recording.
Upload pre-recorded footage
Pre-recorded footage guidelines
File format and size
Supported file formats: .webm, .mp4, and .mov
Maximum file size: 2GB
Footage length
The video you upload must be 1-5 minutes long, filmed as a single continuous take. You cannot upload videos that were filmed in multiple takes, spliced, merged, or manipulated.
Framing
You can only have one person in the foreground of the video.
If you want to create a set of two personal avatars to use in dialogue with each other, check out our Academy team's Personal Avatar deep dive webinar for tips.
Length
Record yourself in any of the supported languages, speaking as though you're having a natural conversation about anything. What you’re saying while recording should have a clear beginning and end. This is a good opportunity to talk about a recent trip or event, or share your favourite anecdote. The more expressive you are, the better your Personal Avatar will be, but don't forget to include pauses while you're speaking. You should pause for a split second every 2-3 sentences, and between 3-5 seconds when you're switching topics.
To upload pre-recorded footage:
- Click on
+ Create avatarin the Avatar page - Select
Record a video. - Watch the overview video with the best practice then click
Next - Select
Upload - Upload your pre-recorded footage
- Select the language of your footage
- Optional: Remove the background from your Personal Avatar (this will make the background transparent)
- Record your consent. Remember: The person featured in the consent video must be the same individual as in the pre-recorded footage. Consent footage must be recorded live and cannot be uploaded.
- Submit your recording
Personal Avatar from video guidelines
To ensure your Personal Avatar looks and performs its best, follow these guidelines when recording your footage. These guidelines are applicable to both in-app recordings and pre-recorded footage uploads.
📹 Camera setup
Device
Use your webcam or an external device hooked up to your computer to capture your performance.
If you’re recording yourself using an external device such as your smartphone or a DLSR:
- Plug the device into your computer and select it in the dropdown menu when setting up your recording environment.
- Keep the camera as still as possible to achieve the best results. A tripod helps, but you can use a stack of books if you don't have one available.
Lighting
Opt for natural light from a window, or a strong light source.
- If you're using a professional lighting setup, softbox lighting works best.
- Avoid harsh or top-down lighting.
- Ensure that the lighting in your background is natural and consistent.
Angle
A front facing camera angle is recommended, but you can try varying the degrees for a more interesting angle.
Framing
- Frame yourself from the waist-up if you'll be recording yourself while standing up.
- Frame yourself from just below your chest if you'll be recording yourself while sitting down.
- Make sure the camera is aligned with your eye level–but just slightly above your eye level is alright, too.
- Make sure that you're the only person in the foreground of the video. Synthesia can only create a personal avatar of one person at a time. If you want to create a set of two personal avatars to use in dialogue with each other, check out our Academy team's Personal Avatar deep dive webinar for tips.
👂Audio
Audio for creating your voice clone is captured at the same time as your video footage, so it’s important that the audio from your footage is clear and audible.
Make sure you're in a quiet environment without too much background or ambient noise.
Recording indoors
A condenser microphone in a quiet room will provide excellent sound quality for your voice cloning. However, your laptop microphone will also do a great job as long as you're in a quiet environment.
Recording outdoors
A lavalier microphone is the best choice due to its portability and ability to capture clear audio from the speaker. Look for one with good noise-canceling features to minimize background sounds.
If you're on an Enterprise plan, you can create a custom voice in a controlled environment after creating your personal avatar to use in your Synthesia videos.
🖼️ Background
- Try to avoid backgrounds that might blend into your Personal Avatar.
- Add a plant or two, or include a single-color art piece in the background to add some flair to your scene. The background impacts the emotional tone of your videos and set the mood for your audience.
- Include some light and unobtrusive movement in the background, such as a colleague working at their desk. This will add depth to your scene and make your Personal Avatar look even more natural.
While including other people in the background can add depth, make sure that you are the only person in the foreground of your recording.
🎙️Performance
Movement
- Avoid sudden and/or extreme movements. Holding a prop like a pen, book, or mug can help you minimize extreme movements.
- Don't cover your face with your hands or any props you might be holding, and avoid resting your forearms on the table (if you're sitting at one).
- Maintain eye contact with the camera.
- Sitting or standing still while recording will capture the best results, but you can incorporate some subtle movement for more natural and dynamic results.
Speech
- Speak naturally and clearly.
- Take a breath in-between paragraphs and close your mouth when you breathe or pause.
- Be expressive and happy for a more engaging personal avatar.
Personal Avatar Requests
Personal Avatar Requests are only available on our Enterprise plans.
You can invite anyone to create a Personal Avatar on your account. By default, any workspace or organization member will be able to send requests, though workspace and organization admins have the option to disable the feature.
This is useful when you need to create videos using the likeness of your company's executives, partners, clients, and brand actors, but:
- they don't have their own Synthesia accounts,
- you want to limit access to your workspace,
- you want to limit the number of licenses used,
- or it isn't feasible for them to log into the account of a licensed user.
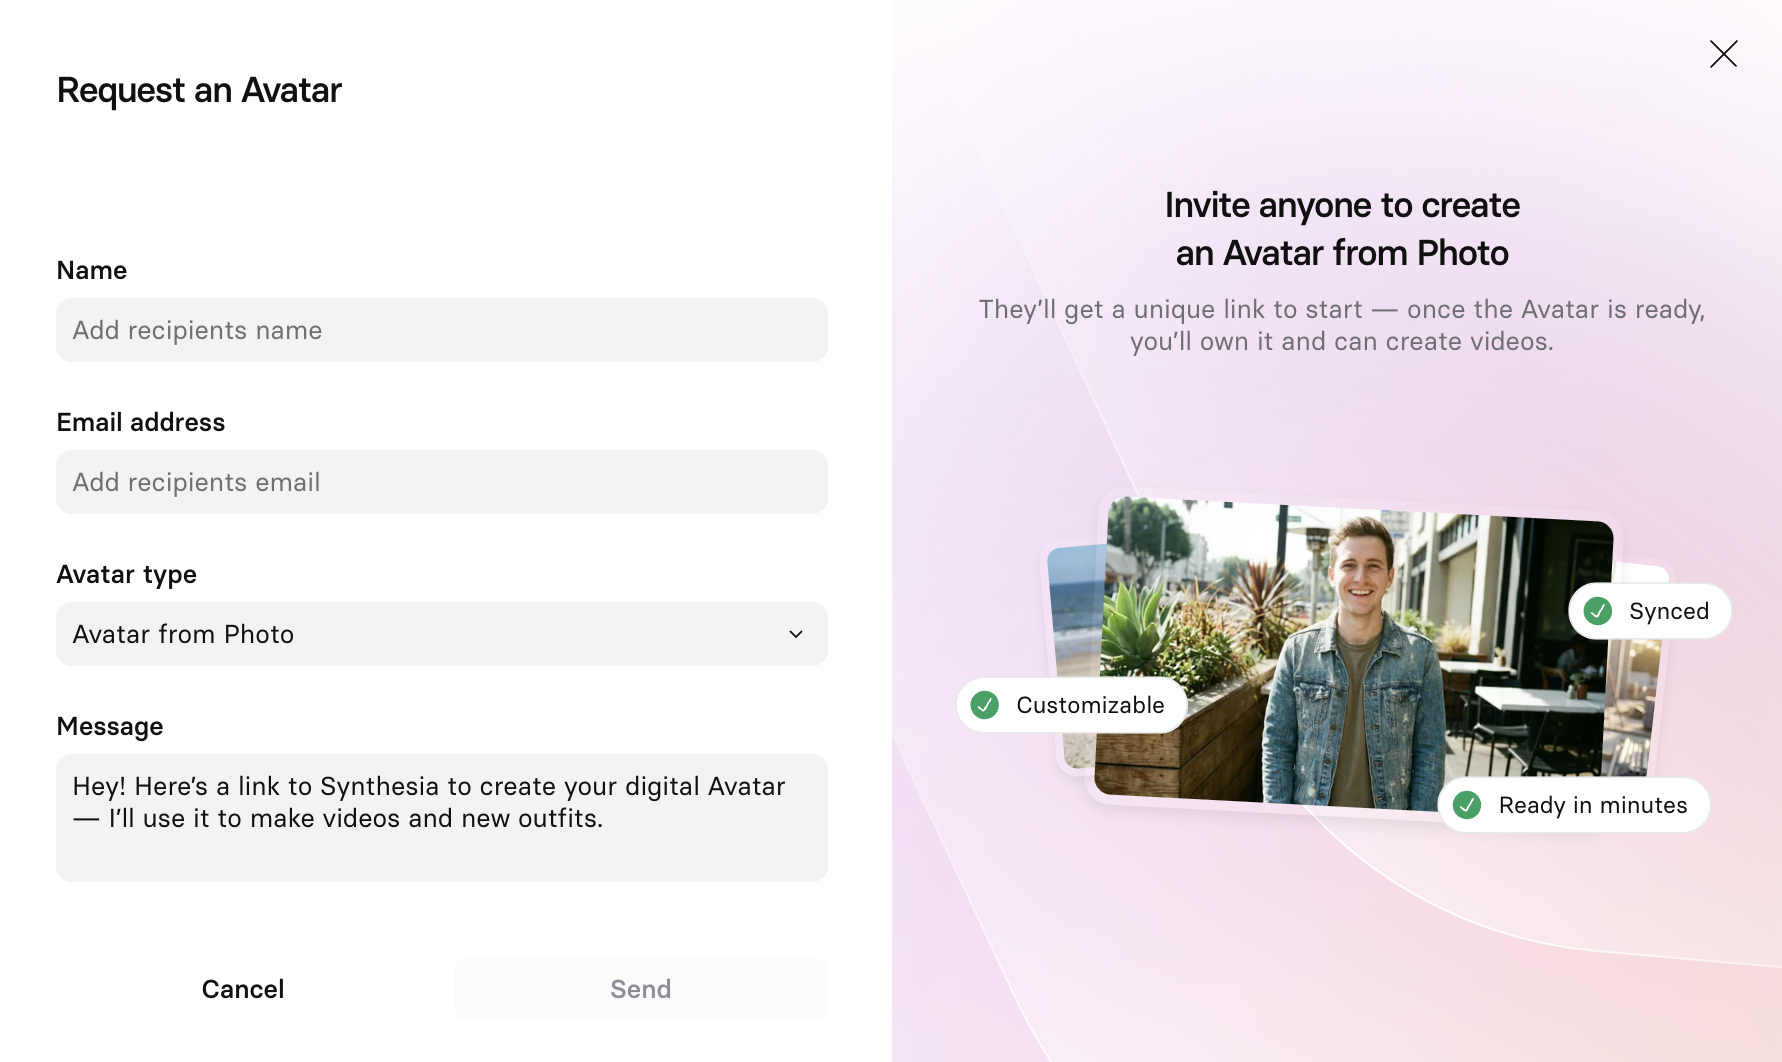
To request an avatar:
- Select
Request from colleaguefrom the Avatar creation flow. - Enter the name and email address of the recipient.
- Select the Avatar type:
- Avatar from Photo
- Avatar from Video (Legacy)
- Optional: Add a message.
- Click
Submitto send them an email with a unique link to create an avatar on your account.
Request URLs expire 7 days after initiating a request.
You will also get a copy of their unique link, which you can send to them directly if they need a reminder. Both creator and requestor will receive email confirmations when the recording is complete and when the avatar has been created.
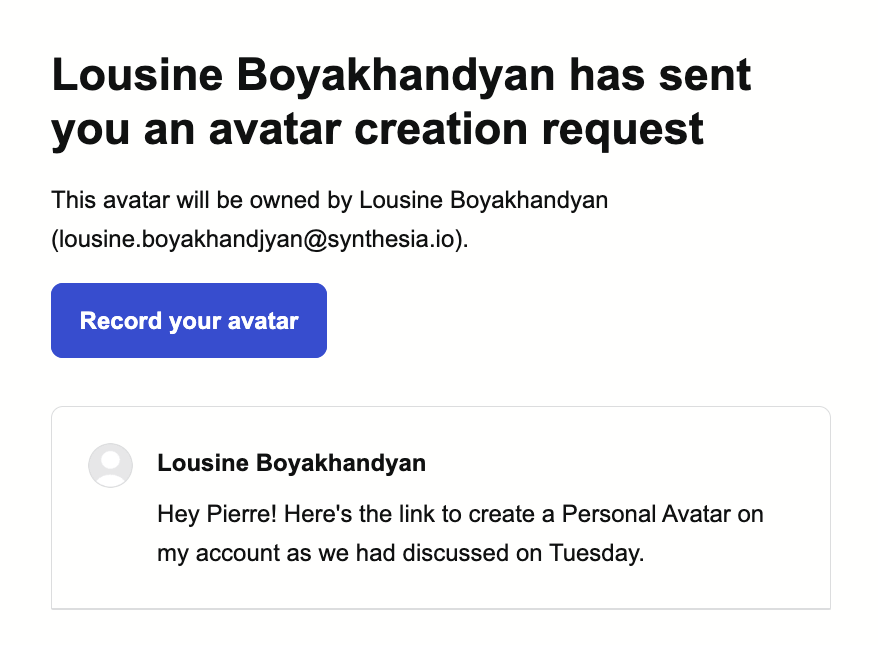
An example of the avatar creation request email sent to the recipient
Ownership of Personal Avatars:If the person that you requested a Personal Avatar from creates a Synthesia account using the same email address that you sent a request to, they will be recognized as the rightful owner of the Personal Avatar that they created, and the Personal Avatar will be transferred from your account to theirs.
This means that you will lose access to their Personal Avatar. If they would like to continue sharing their Personal Avatar with you, they will have to contact Synthesia's Support Team.
Deleting a Personal Avatar
It's easy to delete your own Personal Avatars and voices yourself, so feel free to experiment while creating them.
To delete a Personal Avatar:
-
Navigate to the Avatars page from the Assets section.
-
Find your Personal Avatar in the My Avatars section.
-
Click on the 3-dot button in the top-right corner of the Personal Avatar and select
Deletefrom the drop-down menu
-
A dialog prompting you to confirm your decision will appear. Type "DELETE" in the text field and submit your confirmation to delete the Personal Avatar.
This will permanently delete the Personal Avatar and all data associated with it.This action cannot be undone.
Privacy and security
Our platform uses encrypted data transmission and secure storage on AWS to protect your personal information and ensure that your Personal Avatar is protected from misuse.
We always obtain consent before generating an AI avatar and give avatar owners full control over their avatar's usage, including the ability to request that their data be deleted from our platform at any time.
Updated 2 months ago
What’s Next
- What is the Personal Avatar script? - Synthesia Knowledge Base
- How do I create Personal Avatars from a photo? - Synthesia Knowledge Base
- How can I create a great Personal Avatar? - Synthesia Knowledge Base
- How do I send a Personal Avatar request? - Synthesia Knowledge Base
- How do I create my Personal Avatar from a video? - Synthesia Knowledge Base
- What are the main differences between Personal Avatars and Custom Studio Avatars? - Synthesia Knowledge Base