Voices
Explore Synthesia's voice library or create your own custom voice.
Voice cloning is available on all plans.Some languages are only available for Enterprise plan users. See the supported languages list for details.
The Voices page has two tabs: From Synthesia, which holds Synthesia's stock voice library, and Custom voices, which holds the voices you've cloned.
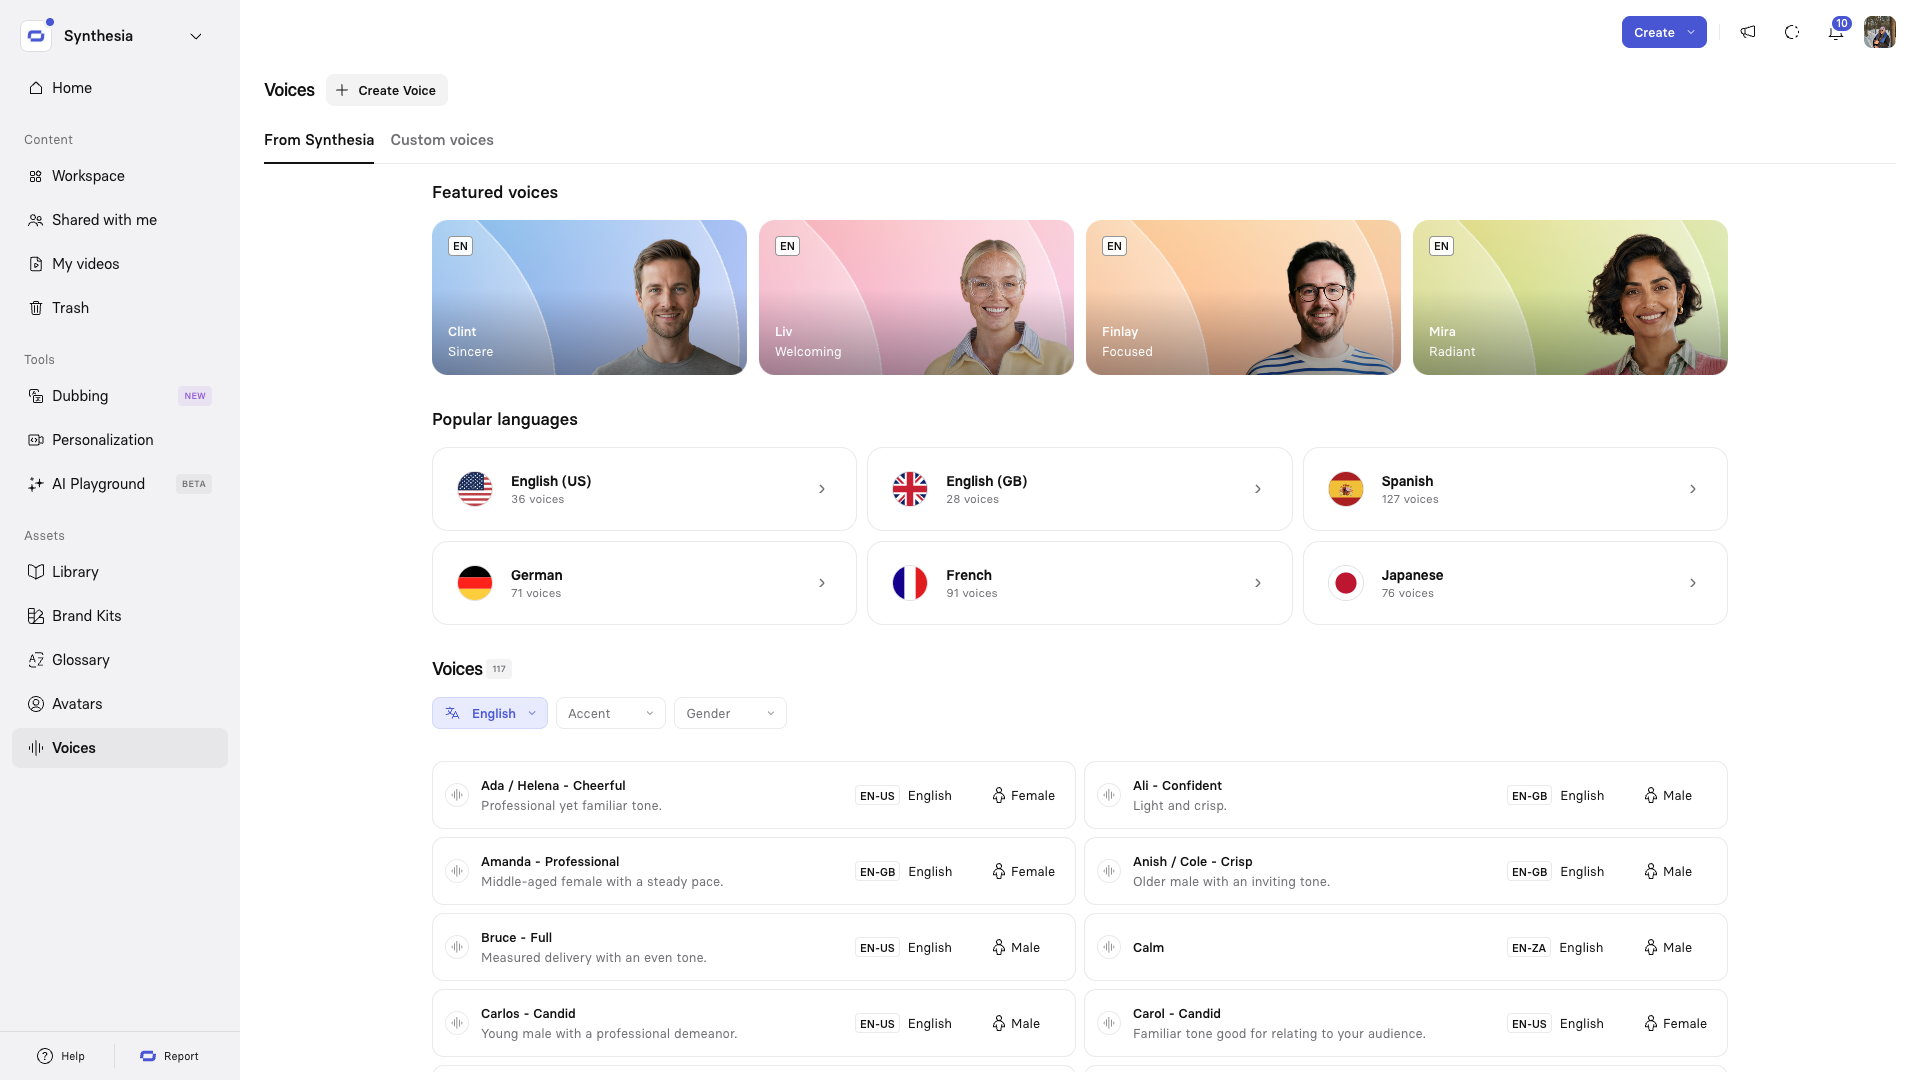
Browse and preview voices
The From Synthesia tab holds Synthesia's stock voice library. You can browse it, preview any voice with your own script, and download the generated audio.
In the From Synthesia tab you'll find Featured voices, quick-access cards for Popular languages, and the full voice list. Use the Language dropdown and the Accent and Gender filters to narrow the list.
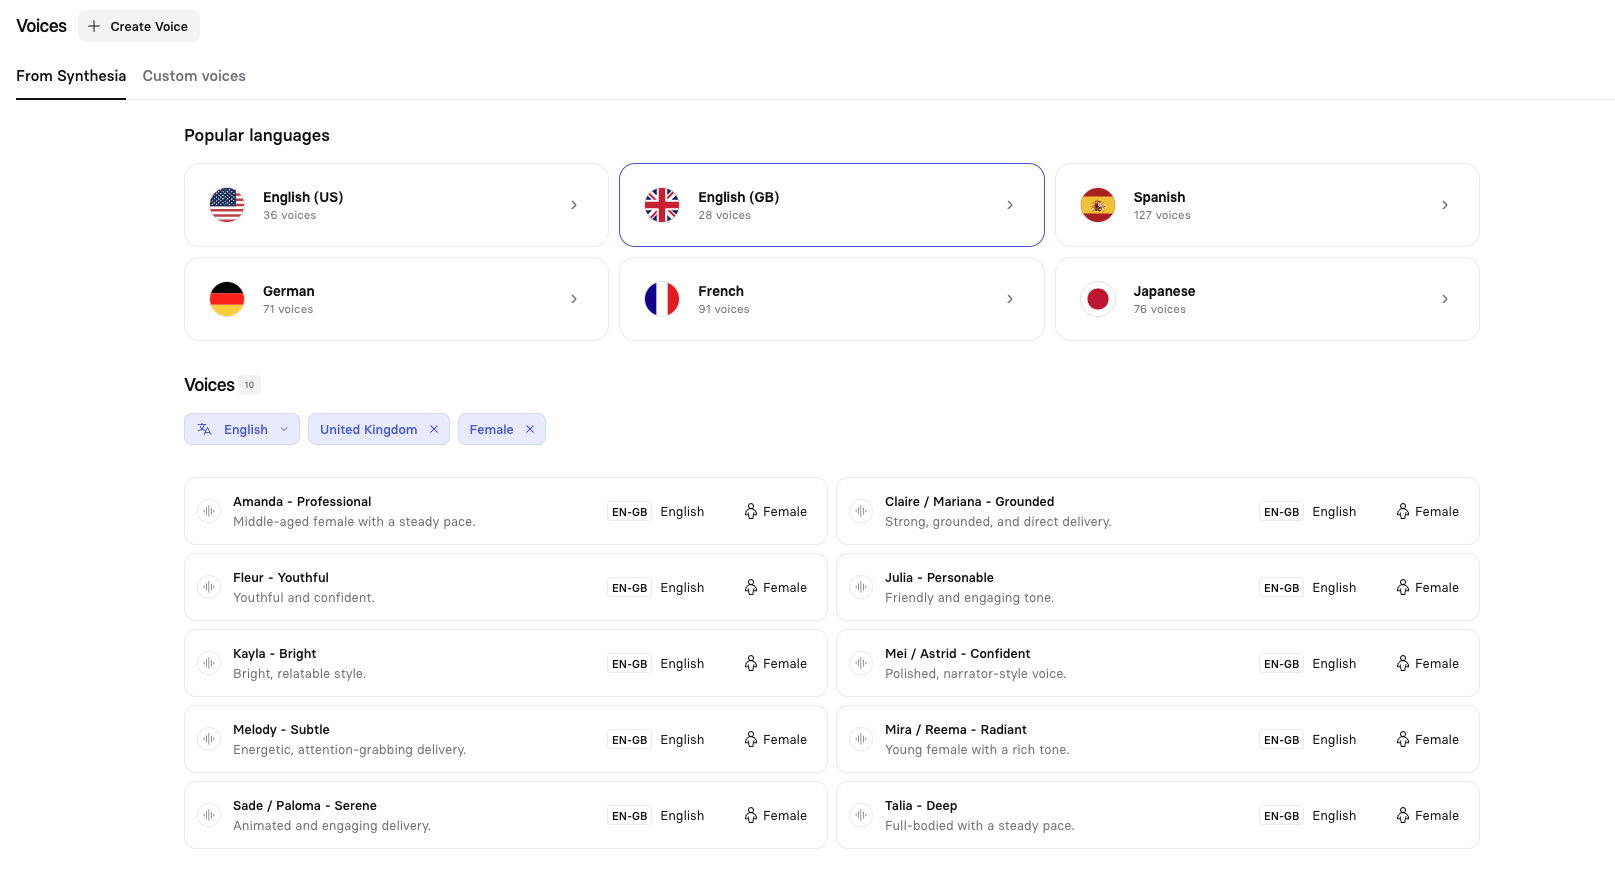
Filterable voice list
Preview a voice with your own script
- Select a voice to open its preview.
- Enter a script in the text box.
- Click
Playto hear the voice read your script.
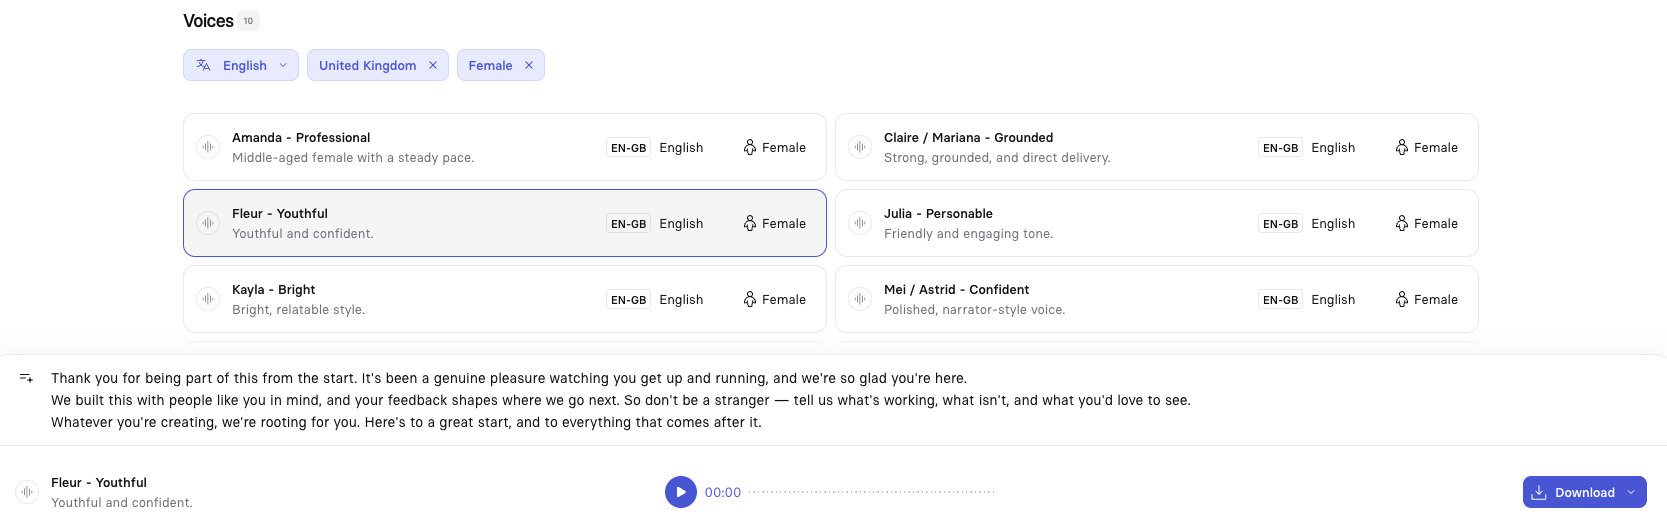
Voice preview
Download voice audio
Click the download icon in the bottom-right of the preview to save the generated audio as a .mp3 or a .wav file.

Download voice audio
Create a new voice
You'll have the option to create a new voice clone by either recording your voice or by uploading pre-recorded audio.
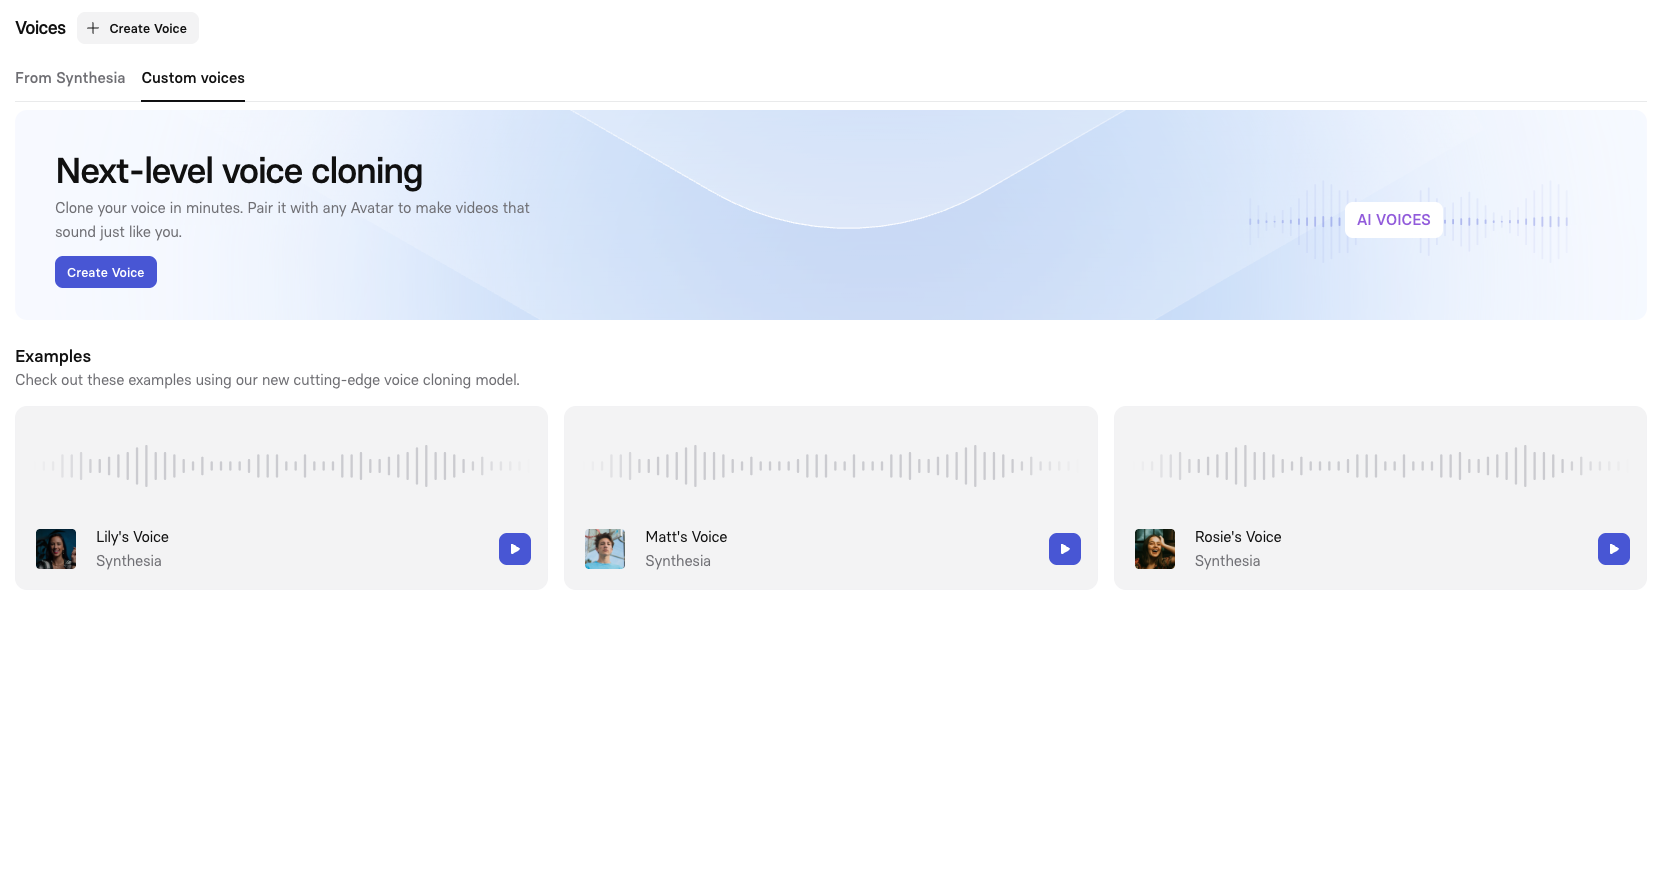
Custom voices tab
Click on the Preview button to hear how a custom voice sounds.
Record your voice
-
Click
Create voiceat the top of the page. -
To better manage your voice clones, give your new voice a unique name by clicking the edit icon at the top-left of the page to edit it.
-
Click
Record your voice. -
Adjust the following settings:
-
Gender: Which avatar gender this voice should be usable for.
-
Language: Select from one of 79 supported languages to record your voice in. The script will be displayed in your selected language.
-
Microphone: Select a microphone to use for your recording.
-
Script speed: You can choose to have the script scroll at a slow, medium, or fast pace, in accordance with your natural speaking rate. You can click
Start recordingto preview the script speed and cancel the recording session if you need to change it.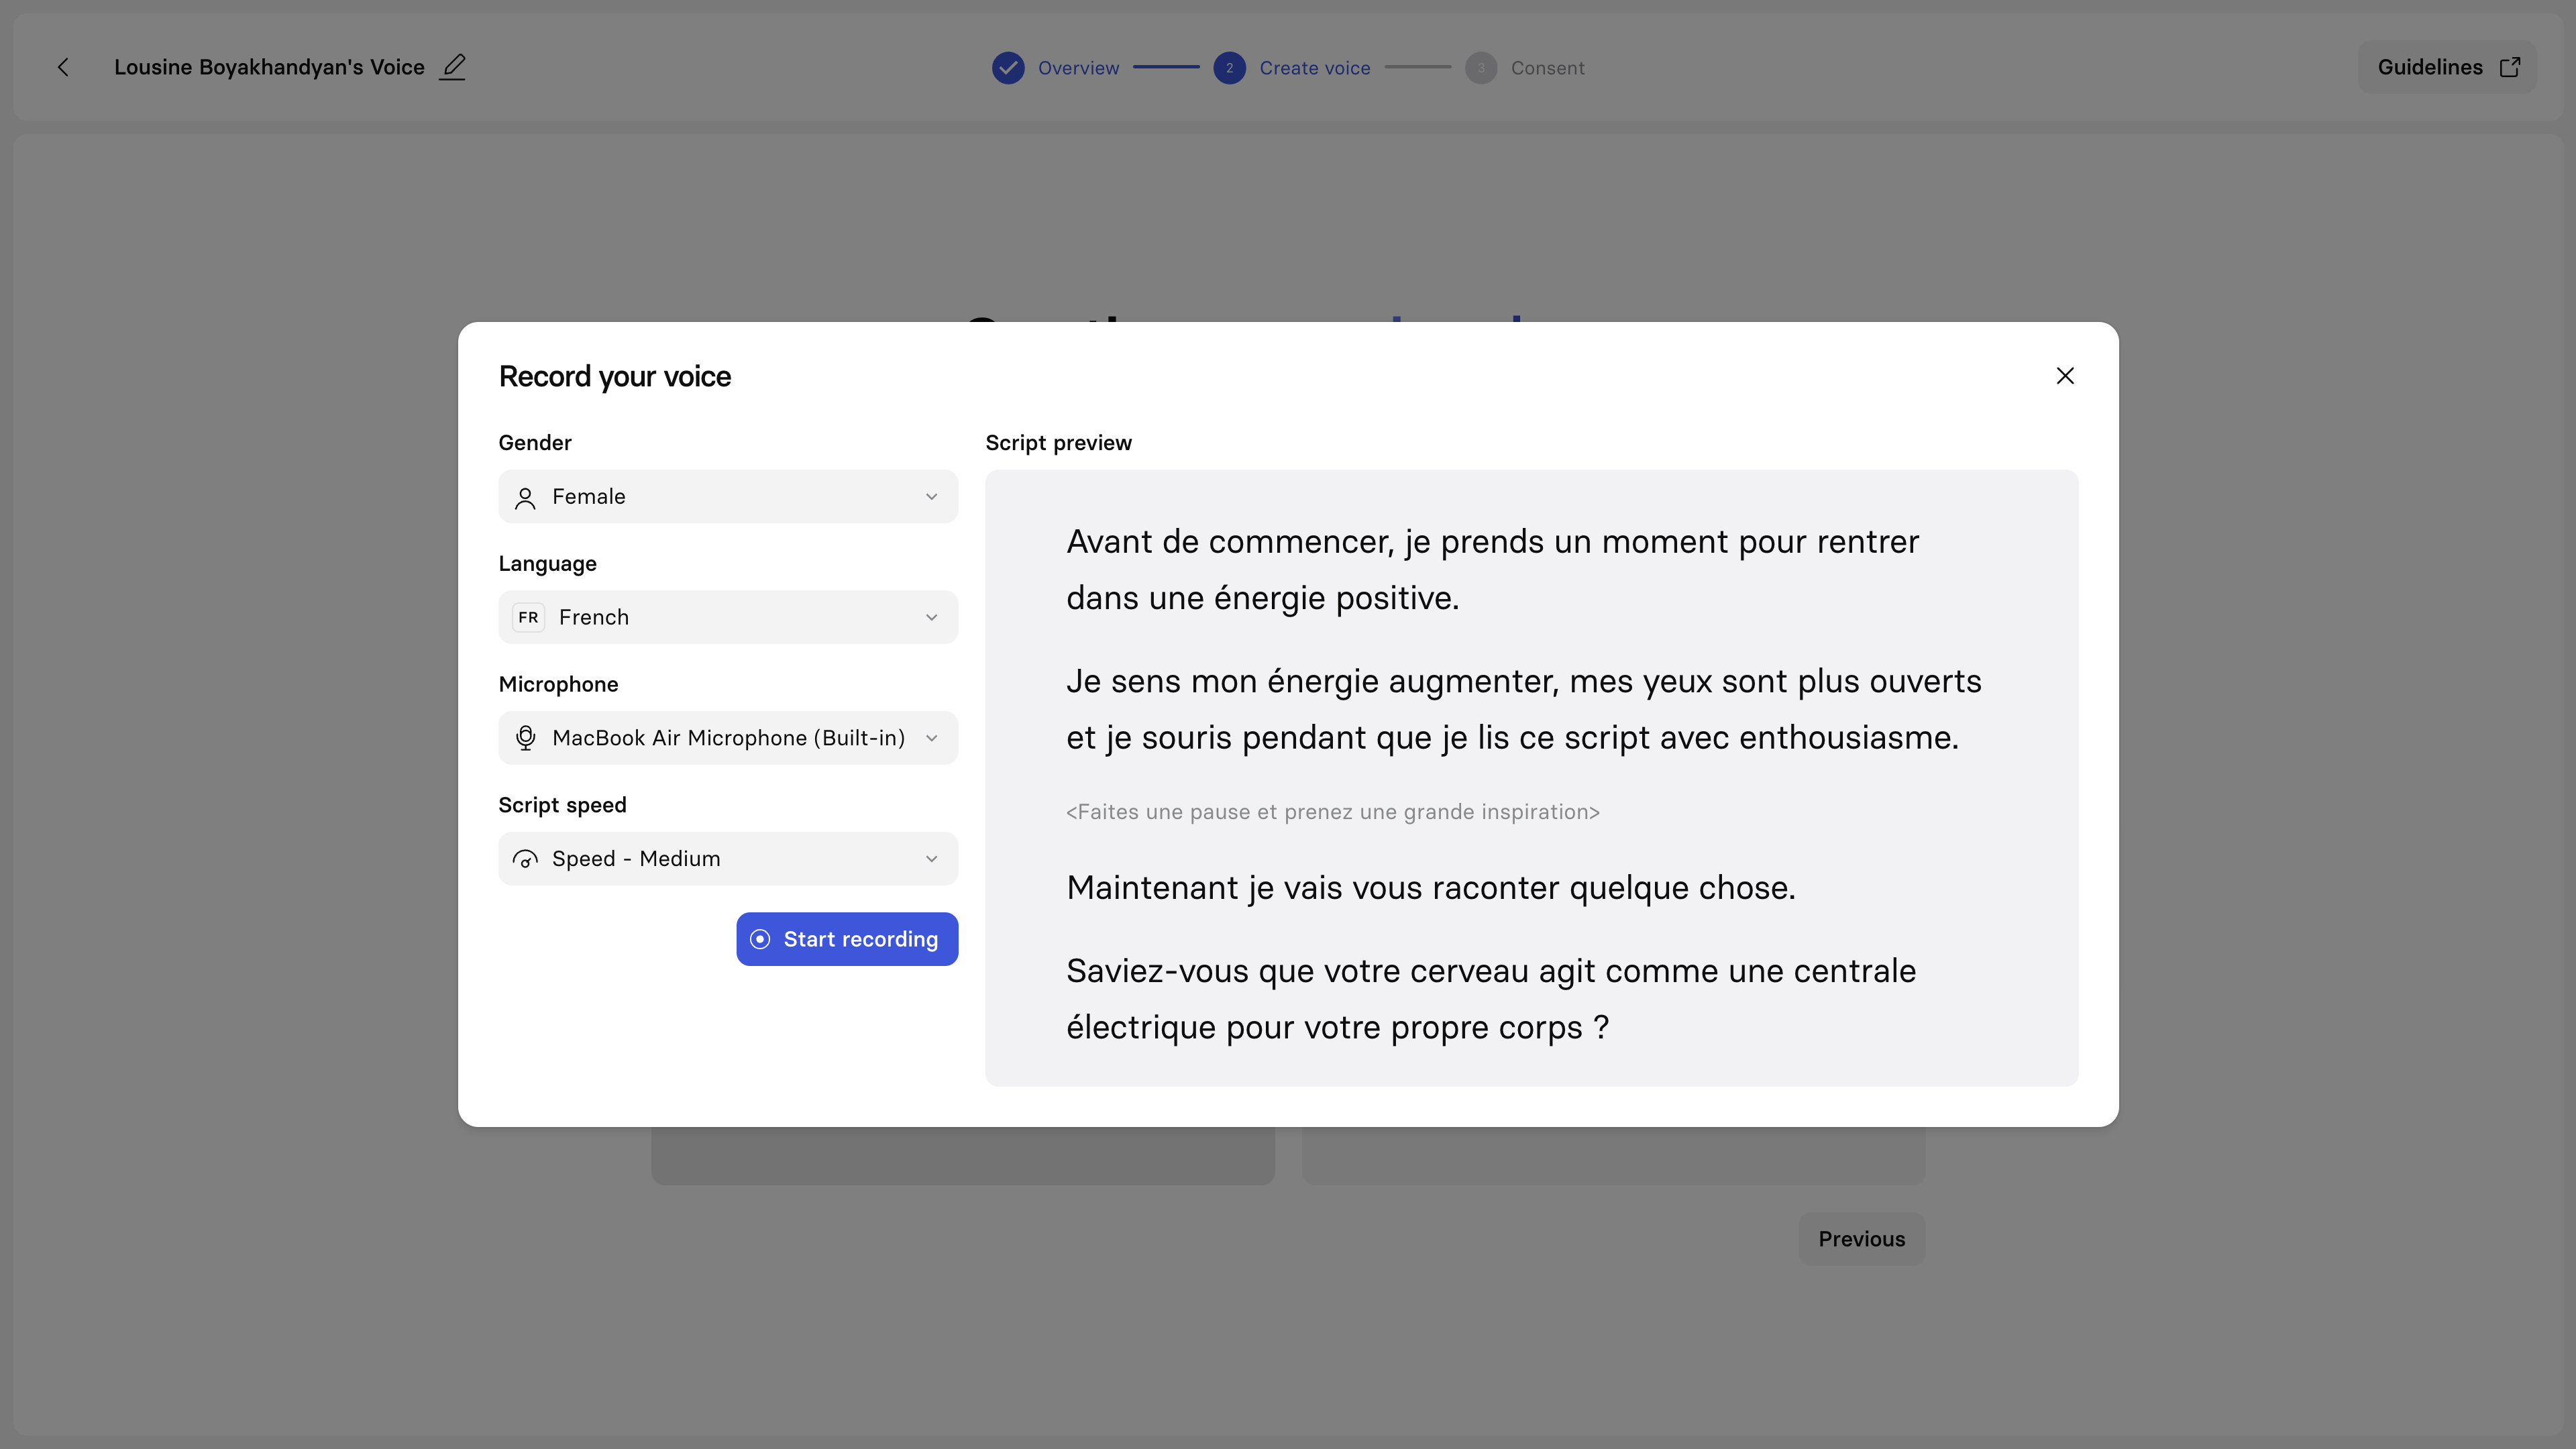
-
-
Once you're ready, click
Start recordingand start reading the script once the countdown ends.
You can always hitRecord againin the top-left to restart the recording process.Multiple takes are encouraged to help you get comfortable with the script.
Upload audio
-
Click
Create voiceat the top of the page. -
To better manage your voice clones, give your new voice a unique name by clicking the edit icon at the top-left of the page to edit it.
-
Click
Upload audioand select the file to upload.
Supported file types:.mp3,.mp4,.wav,.m4a,.weba,.aac,.flac,.ogg -
Adjust the following settings:
- Gender: Which avatar gender this voice should be usable for.
- Language: Select which of the 79 supported languages your audio file was recorded in.
-
Click
Nextto proceed to the consent flow.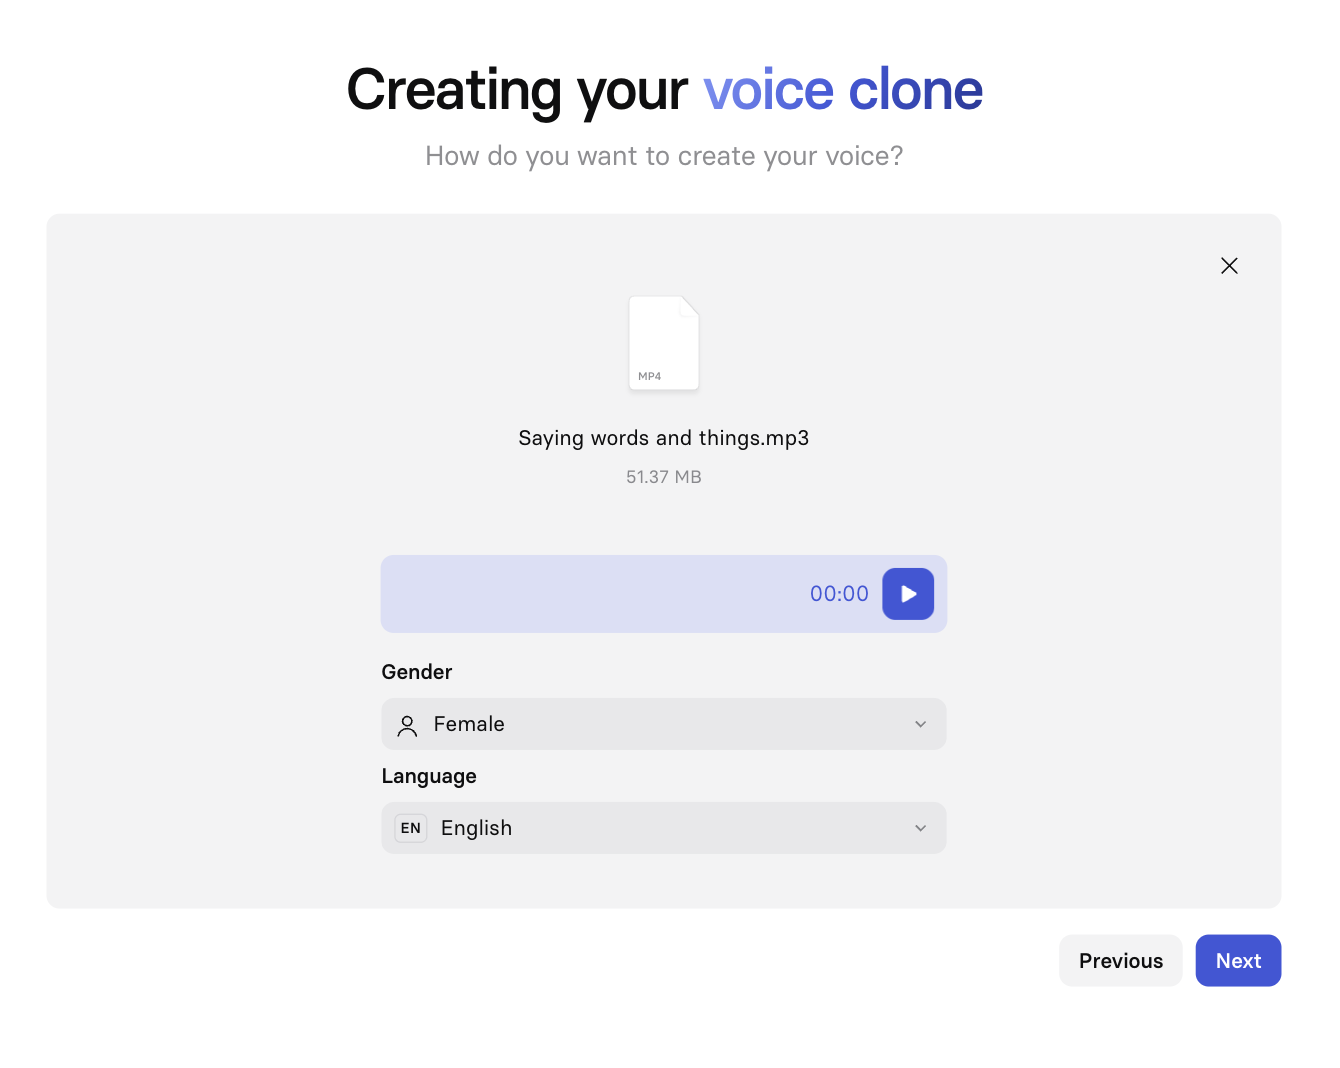
Consent
After you either complete the recording for the main script or upload your pre-recorded audio file, click Record consent to record your consent audio. Consent must be recorded live and cannot be uploaded.
- Select a microphone and script speed, and check off the checkbox for biometric consent. The consent script will contain a unique passphrase that is randomly generated.
- Record your consent and click
Submit consentto start processing your audio. - All done! Your voice should be ready in 5–10 minutes. You’ll receive an email once your voice is ready.
Supported languages for creation
Arabic, Bulgarian, Chinese, Croatian, Czech, Danish, Dutch, German, Greek, English, Filipino, Finnish, French, Hindi, Hungarian, Indonesian, Italian, Japanese, Korean, Malay, Norwegian, Polish, Portuguese, Romanian, Russian, Slovak, Spanish, Swedish, Tamil, Turkish, Ukrainian, Vietnamese
Enterprise only languages for creation
Afrikaans, Amharic, Assamese, Azerbaijani, Bengali, Bosnian, Catalan, Welsh, Estonian, Basque, Persian, Irish, Galician, Gujarati, Armenian, Icelandic, Hebrew, Javanese, Georgian, Kazakh, Khmer, Kannada, Lao, Lithuanian, Latvian, Macedonian, Malayalam, Mongolian, Marathi, Maltese, Burmese, Nepali, Odia, Punjabi, Pashto, Sinhala, Slovenian, Somali, Albanian, Serbian, Sundanese, Swahili, Telugu, Thai, Urdu, Uzbek, Zulu
Using a custom voice
Once your voice is generated you can use it in your videos like any other voices by going into the Custom voices section:

Supported languages for usage
Your voice can be used in any of the following supported languages:
Arabic, Bulgarian, Chinese, Croatian, Czech, Danish, Dutch, German, Greek, English, Filipino, Finnish, French, Hindi, Hungarian, Indonesian, Italian, Japanese, Korean, Malay, Norwegian, Polish, Portuguese, Romanian, Russian, Slovak, Spanish, Swedish, Tamil, Turkish, Ukrainian, Vietnamese
Enterprise only languages for usage
Afrikaans, Amharic, Assamese, Azerbaijani, Bengali, Bosnian, Catalan, Welsh, Estonian, Basque, Persian, Irish, Galician, Gujarati, Armenian, Icelandic, Hebrew, Javanese, Georgian, Kazakh, Khmer, Kannada, Lao, Lithuanian, Latvian, Macedonian, Malayalam, Mongolian, Marathi, Maltese, Burmese, Nepali, Odia, Punjabi, Pashto, Sinhala, Slovenian, Somali, Albanian, Serbian, Sundanese, Swahili, Telugu, Thai, Urdu, Uzbek, Zulu
Voice management
Voice sharing
Note:Avatars and voices are shared individually. Sharing an avatar does not automatically share the corresponding voice.
Go to the Voices page in your Synthesia account and find the voice you want to share.
To share it with a specific user, or several users:
- Open up the 3-dot menu and select
Share. - Type the names of the users you'd like to share it with in the
Select usersfield, or click on the dropdown button for that field to find them in a list of workspace users. - Click the
Sharebutton next to theSelect usersfield to share your voice.
To share it with the entire workspace:
- Open up the 3-dot menu and select
Share. - In the bottom-left of the Share menu, click on the
Invite onlydropdown. - Select the
Shared with _Your Workspace Name_option.
You can return to the Share menu anytime to:
- Manage users your voice is shared with (add or remove access)
- Switch between sharing your voice with the entire workspace or with specific users
Note:
- If the option to share your voice with the entire workspace is grayed out, your workspace admin has likely disabled this functionality. Contact them for further instructions.
- You can only share your voice within the workspace it exists it. If you need to share a voice with another workspace, contact Support ([email protected]) and provide them with:
- The voice ID (via
Copy IDin the options menu)- The workspace you'd like to create a copy of the voice in
How to revoke access to your voice
For a specific user:
- Open up the 3-dot menu and select
Share. - Find the user in the list of users and click on the
Shareddropdown. - Select the
Removeoption.
For the entire workspace:
- Open up the 3-dot menu and select
Share. - In the bottom-left of the Share menu, click on the
Shared with _Your Workspace Name_dropdown. - Select the
Invite onlyoption.
Removing access doesn’t retroactively remove the voice from already-generated videos by other users.They'll have to replace the voice in each video the voice has been used in, regenerate them, and republish them.
Permissions and notifications
- Voice owners can grant and revoke access at any time.
- If someone shares a voice with you, you’ll get:
- An email notification.
- An in-product notification.
How to rename a voice
Use the 3-dot menu on a voice and select Rename to give it a new name.
How to delete a voice
Deleting a voice will permanently delete it and all data associated with it. This action cannot be undone.Deleting a voice will not remove it from any videos that have already been generated with it, but if you need to update and regenerate any of those videos, you'll have to replace the deleted voice.
Use the 3-dot menu on a voice and select the Delete option to delete it. You will be prompted to confirm this action before the voice is deleted.
Shared voices
You cannot delete voices that have been shared with you. Instead, you'll have to remove yourself from the list of users the voice has been shared with.
To remove your access to a shared voice:
- Go to the Voices page in your Synthesia account.
- Find the voice you want to remove your access from.
- Open up the 3-dot menu and select
Share. - Find your name in the list of users and click on the
Shareddropdown. - Select the
Removeoption.
Updated 7 days ago
What’s Next
- How do I clone my voice in Synthesia? - Synthesia Knowledge Base
- Can I rename my voice clone? - Synthesia Knowledge Base
- How do I use my voice clone in a video? - Synthesia Knowledge Base
- Why is my voice clone not playing with my personal avatar? - Synthesia Knowledge Base
- Why is my accent not being captured in my voice clone? - Synthesia Knowledge Base
- How do I share avatars and voices with my team? - Synthesia Knowledge Base