---
updatedAt: 2026-09-02T17:23:49.000Z
agentTools:
projectIndex: https://docs.synthesia.io/llms.txt
---
# Avatar
Add an avatar to your scene and customize its outfit, background, pose, and branding.
## Avatar picker
The avatar picker—opened from the `Avatar` button in the toolbar—lets you search and filter to find the avatar you want. After you add an avatar to your scene, you can adjust its appearance and settings from [its contextual menu](#the-contextual-menu) in the canvas, or from [the inspector panel](#avatar-settings) on the right.
### Search
Use the search bar to find an avatar by name or description.
### Filters
| Filter | Shows |
| ---------------- | ------------------------------------------------------ |
| `All` | Every avatar available to you, across all sources. |
| `From Synthesia` | Synthesia's stock avatars. |
| `My Avatars` | Avatars you've created yourself. |
| `Shared with me` | Avatars a teammate has shared with you. |
| `Recent` | Avatars you've used recently, regardless of source. |
| `Brand kit` | Avatars included in your currently selected brand kit. |
`All`, `From Synthesia`, `My Avatars`, and `Shared with me` are grouped together as views of your avatar library. `Recent` and `Brand kit` sit alongside them as their own filters.
## Identifying avatar types in the picker
The avatar picker groups avatars under named sections that reflect the underlying avatar model, and the settings you'll have available for an avatar depend on its type: `Express-1`, `Express-2`, or `Legacy`.
Within those sections, a badge on an avatar's thumbnail can tell you more about what it supports:
| Badge | Meaning |
| ------------------------- | ------------------------------------------------------------------------------------------------------------------------------------------------------------------------------------------------------------------------------------------------------------- |
| Pencil icon | A customizable avatar—supports outfits, spaces, poses, and B-roll generation. See [Customizable avatars](#customizable-avatars). |
| Camera icon with a number | A multi-cam avatar. The number shows how many camera angles it offers. These avatars let you switch between different shots to create more dynamic videos using the [swap shot effect](https://docs.synthesia.io/docs/animations-and-effects#avatar-effects). |
| No badge | Has one look and one camera angle. |
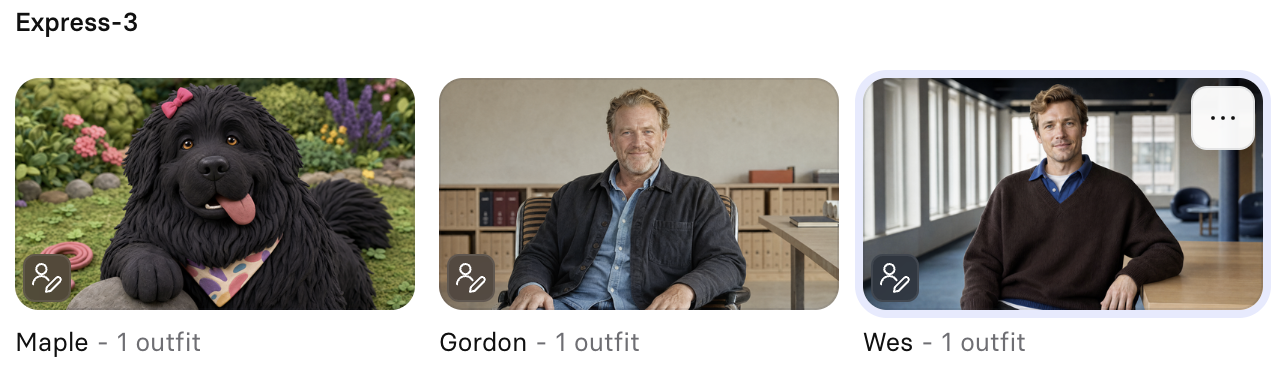
### Express-3 avatars
Express-3 avatars include customizable avatars (stock) and [Avatar Builder](https://docs.synthesia.io/docs/avatar-builder) avatars.
Express-3 avatars offer a deep set of tools for outfits, spaces, poses, and generating B-roll, alongside standard framing controls:
### Express-2 avatars
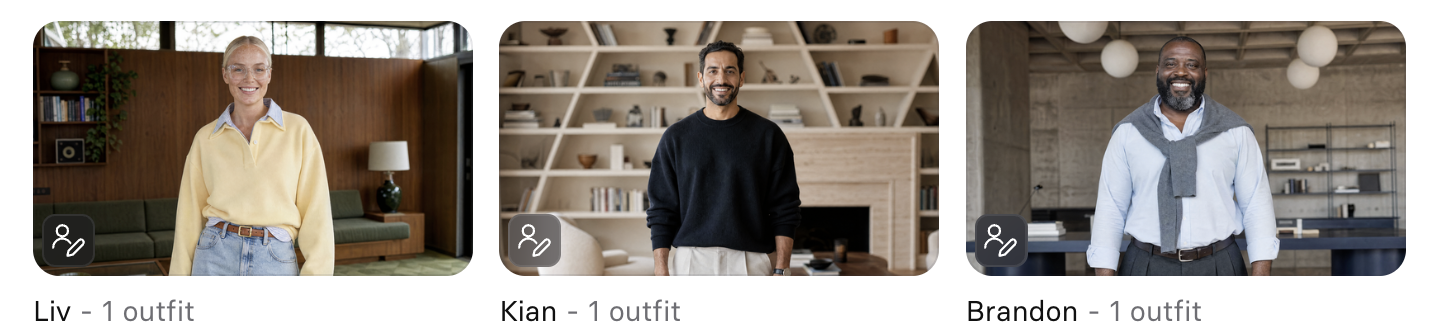
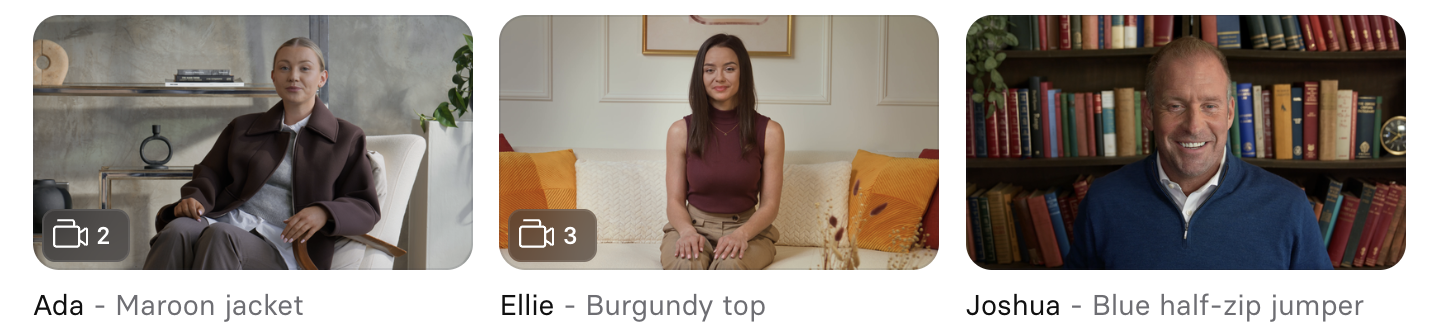
Express-2 avatars include customizable avatars (stock and custom), and Synthesia's stock personal avatars.
Customizable avatars (Synthesia's customizable avatars and Personal avatars from photo) offer a deep set of tools for outfits, spaces, poses, and generating B-roll, alongside standard framing controls:
Stock personal avatars offer standard framing controls, and most offer multiple camera angles; their backgrounds cannot be changed or made transparent:
### Express-1 avatars
Express-1 Studio avatars (stock and custom) offer standard framing and simple background controls, and some offer multiple camera angles:
### Legacy avatars
Legacy avatars include our oldest stock Studio avatars, and any Personal avatars from video:
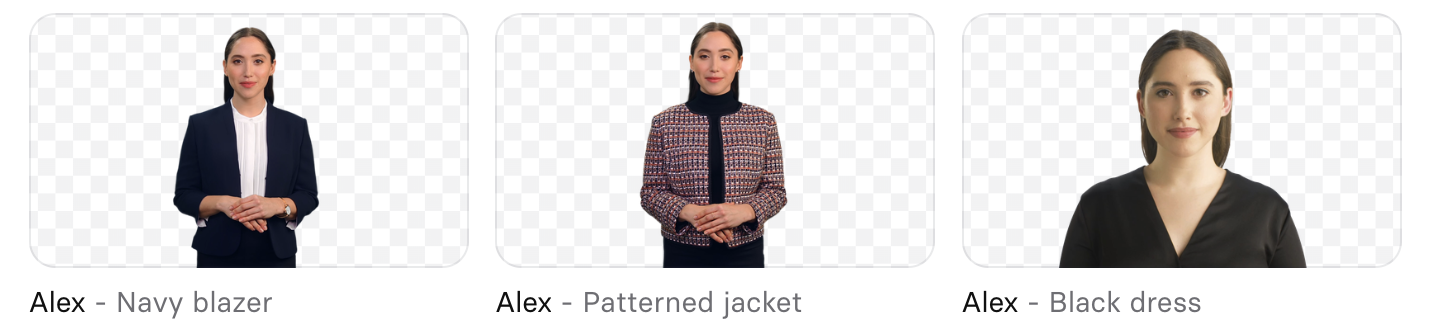
* Personal avatars from video offer standard framing controls.
* Legacy stock Studio avatars offer standard framing and simple background controls. Some stock legacy avatars include a limited set of predefined gestures.
## Adding an avatar to a scene
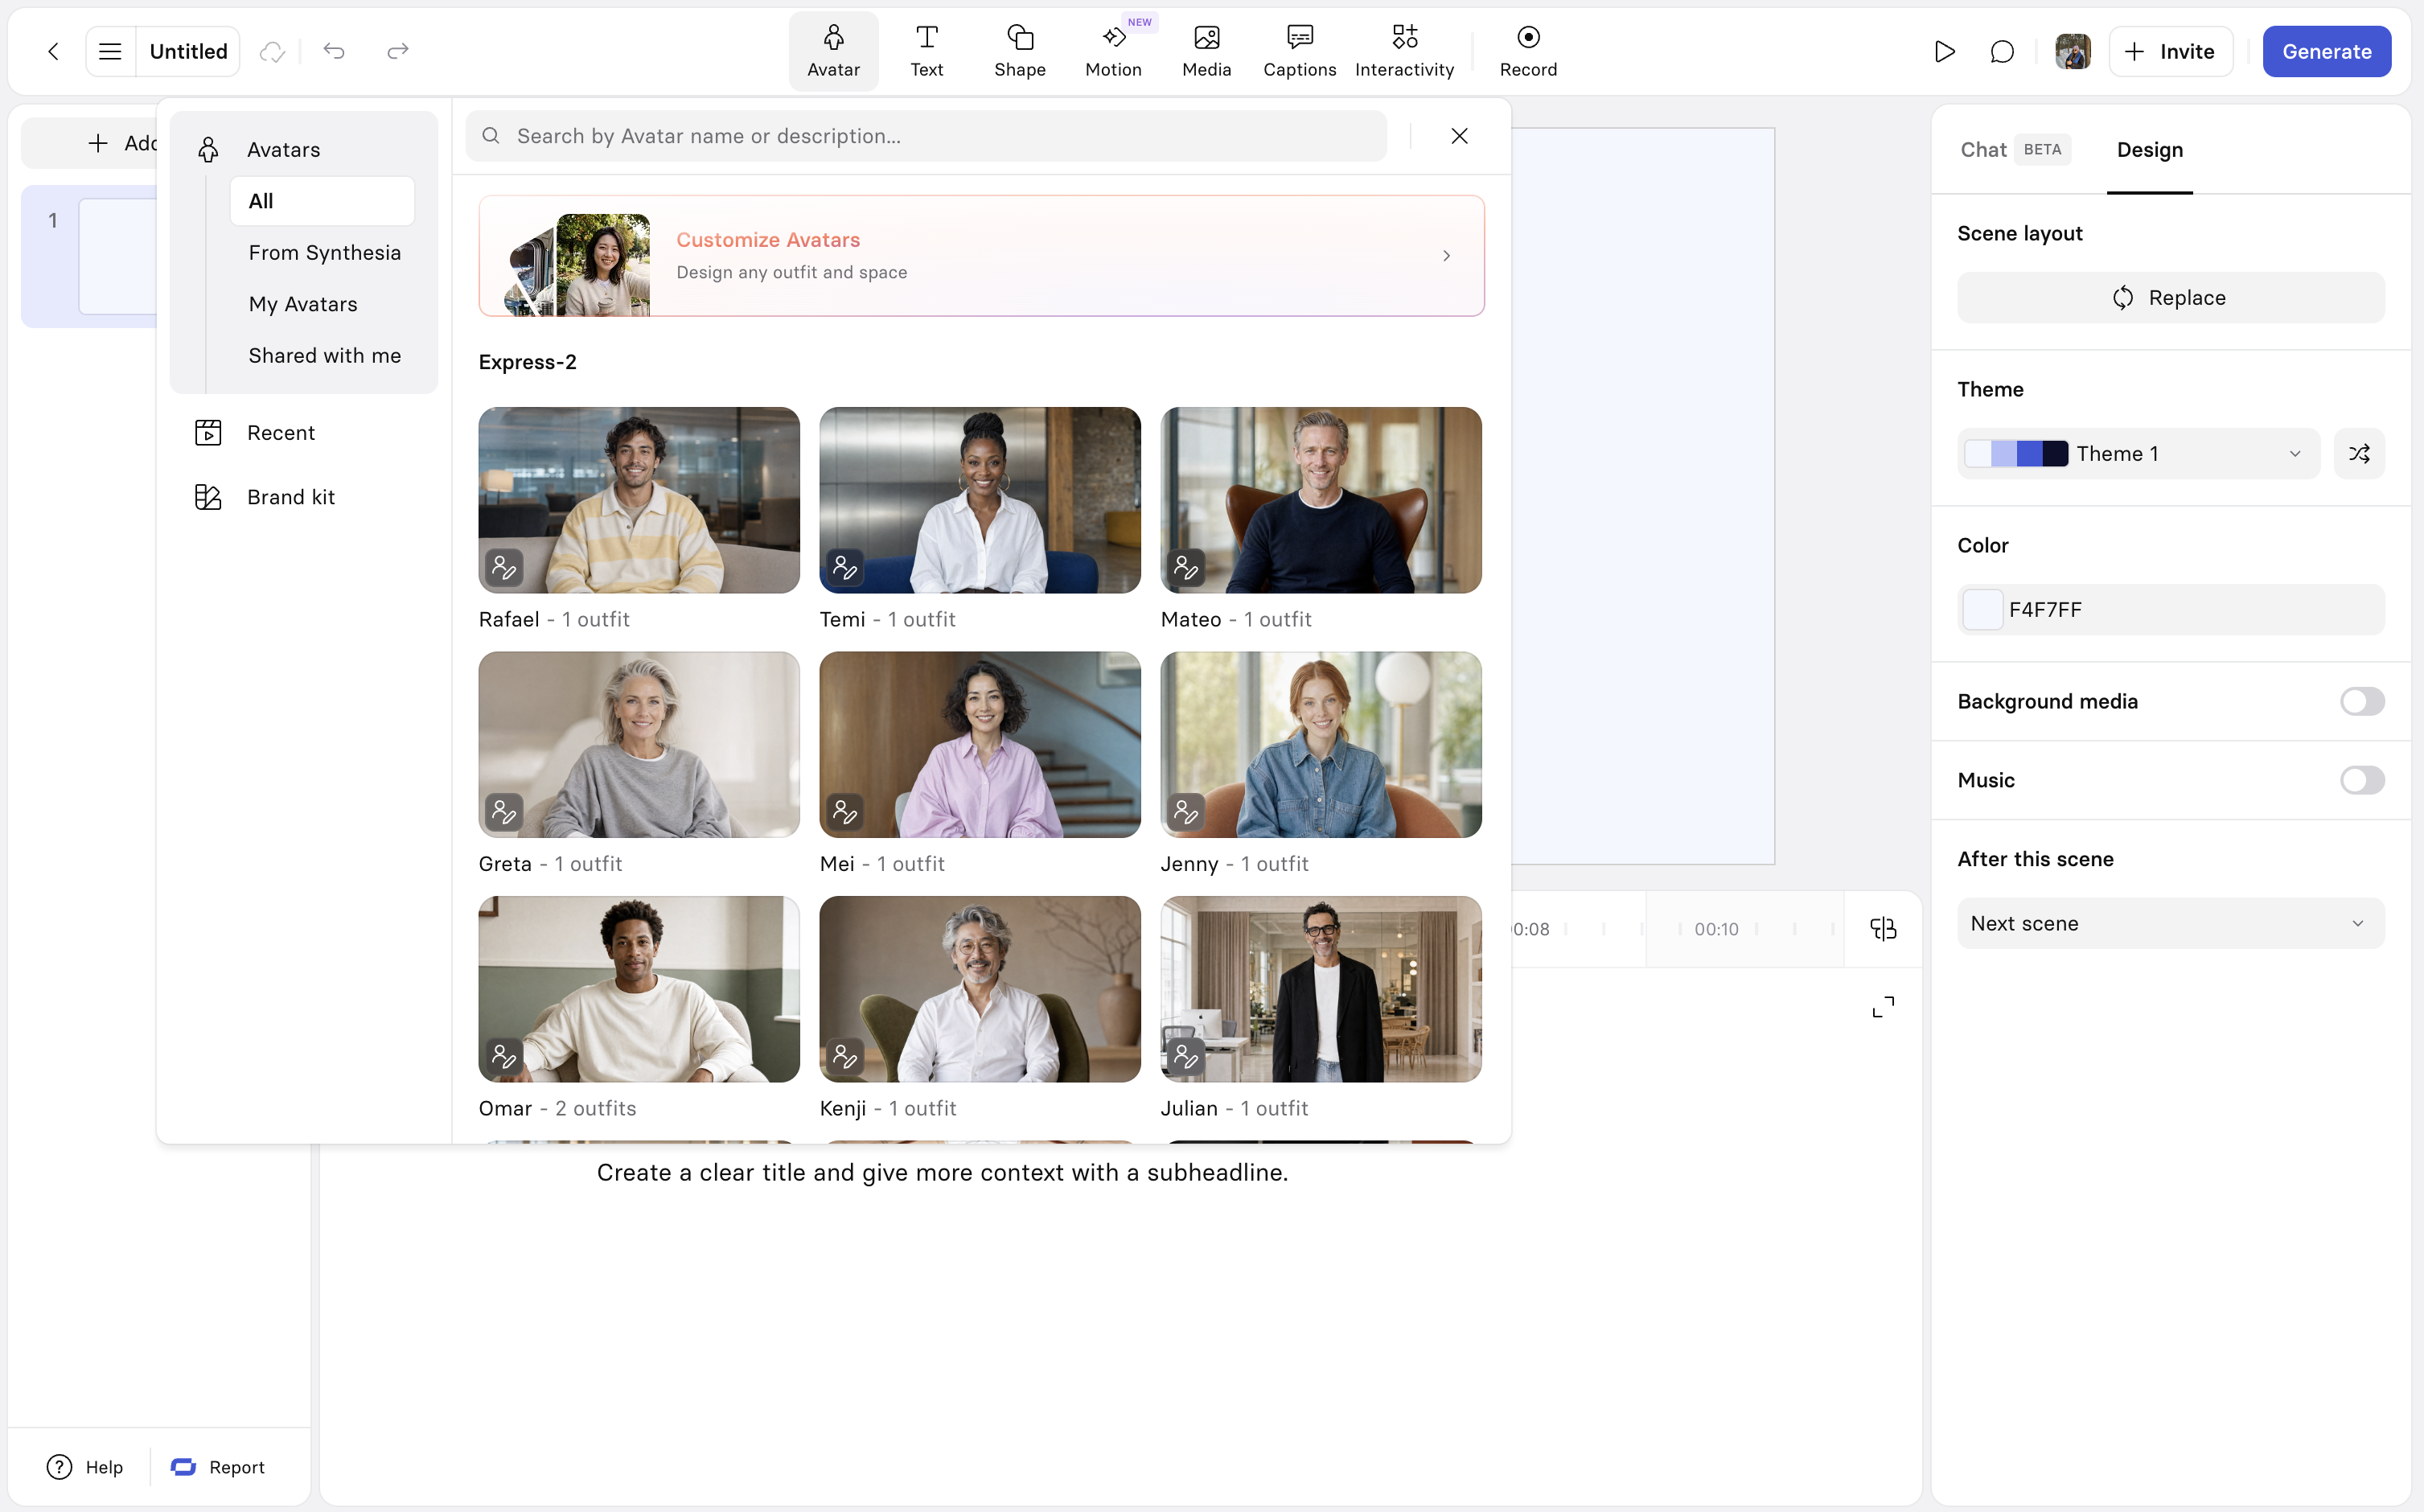
**To add an avatar to a scene**:
1. Select the `Avatar` button in the toolbar at the top of the editor.
2. Browse through or search for avatars that are included in your plan.
3. Select the avatar to add it to the scene.
What happens next depends on the avatar's type:
| Avatar type | What happens when you select it |
| ---------------------------------------------------------------------------------------------------------------- | --------------------------------------------------------------------------------- |
| Studio avatars (stock or custom), Personal avatars from video, stock Personal avatars with a built-in background | Added directly to the scene. |
| Customizable avatars—Synthesia's customizable avatars, and Personal avatars from photo | Opens a picker where you choose an outfit and a space before the avatar is added. |
### Adding a customizable avatar
Selecting a customizable avatar opens a picker with three steps:
1. Choose the avatar.
2. Choose an outfit for it.
3. Choose a space: `No space` (transparent background), a space you've already used with this avatar and outfit (under `Recent`), or any space from the library (under `All`).
You can navigate between the steps using the breadcrumb at the top: `Avatars > Outfits > Spaces`.
Selecting a space adds the avatar to the scene. If you've used that exact avatar, outfit, and space combination before, it appears immediately. If it's a new combination, Synthesia renders it first—you'll see an "Adding Avatar to space" progress indicator before it appears in the canvas.
### You can use customizable avatars to generate B-roll footage and images.
See [Media](https://docs.synthesia.io/docs/media#create-with-ai-third-party-model-integrations) for the Create with AI workflow.
## The contextual menu
When you select an avatar in the canvas, a contextual menu appears above or below it with quick actions. Which icons you see depend on the avatar's type.
| Icon | Action | Available for |
| ---------------------------- | -------------------------------------------------------------------------------------------------------------------------------------------------------------------------- | ------------------------------------- |
| Avatar thumbnail | Swap the avatar. | All avatar types. |
| Background / Space thumbnail | Studio avatars: set or remove a colored background. Customizable avatars: reopen the outfit and space picker. | Studio avatars; Customizable avatars. |
| Camera | Switch camera angle. Available angle and zoom options vary by avatar. | Multi-cam avatars only. |
| Customize Avatar (pencil) | Opens a focused editor to change just the outfit or just the space. | Customizable avatars only. |
| Create media (sparkle) | Opens `Create with AI` in the Media panel, with this avatar pre-selected. See [Media](https://docs.synthesia.io/docs/media#create-with-ai-third-party-model-integrations). | Customizable avatars only. |
| `•••` | More options. | All avatar types. |
## Avatar settings
Select an avatar you've added to the canvas to access its settings in the Design tab of the inspector panel.
**To replace an avatar** (Studio, stock, or Personal avatar from video):
1. Select the avatar in the canvas.
2. In the Avatar section of the inspector panel, select the current avatar.
3. Browse through or search for avatars that are included in your plan.
4. Select an avatar to replace it. For a customizable avatar, selecting the avatar in the inspector panel reopens the full `Avatars > Outfits > Spaces` picker instead, since swapping the avatar there can also mean picking a new outfit and space.
5. *Optional*: Apply the replacement to every scene it appears in by selecting `Change all` in the toast notification that appears at the bottom of the editor.
### Appearance
The appearance settings control the framing of the avatar. They're the same across all avatar types:
* `Full`: Set the avatar's bounding box to the dimensions of the canvas and center it vertically and horizontally with the canvas.
* `Circle`: Contain the avatar in a circle.
* `Box`: Reset the avatar's bounding box to its default boundaries.
The `Full` and `Box` options both let you crop the avatar as needed. All avatar types can be cropped.
`Radius`: adjusts the roundness of the container that holds the avatar. This setting is not available for the `Circle` framing.
### Studio avatars
For stock or custom Studio avatars:
* **Swap the avatar** by selecting its thumbnail in the Avatar section of the inspector panel, or from the contextual menu.
* **Set a colored background**, or remove it, from the contextual menu's background control. This opens a `Colored background` panel with colors already used elsewhere in your video, plus a base color palette. Studio avatars don't have a `Space` section in the inspector panel—a colored background is the only background option.
* **Switch camera angle**, if the avatar is multi-cam: use the `Camera` field in the inspector panel, or the camera icon in the contextual menu. Angle options (for example `Front` / `Angled` / `Angled deep`, or `Front` / `Angled left` / `Angled right`) and `Zoom` levels vary by avatar.
### Personal avatars from video, and stock Personal avatars
For Personal avatars created from video, and stock Personal avatars that come with their background already baked in:
* **Swap the avatar** from the contextual menu or the inspector panel. This is the only background-related action available for these avatars.
* **Background**: fixed at creation time. You can only remove it if you chose to remove the background during avatar creation—see [Personal Avatars](https://docs.synthesia.io/docs/personal-avatars#to-record-in-app). There's no way to add, change, or remove a background afterward.
* **Switch camera angle**, if the avatar is multi-cam (only available for stock Personal avatars): same `Camera` field and contextual menu icon as Studio avatars, with angle and zoom options that vary by avatar.
### Customizable avatars
For Synthesia's customizable avatars and Personal avatars from photo:
* The **Avatar** section of the inspector panel shows your current avatar and outfit (for example, "Matteo / Casual Tee Jeans"). Selecting it reopens the `Avatars > Outfits > Spaces` picker, pre-loaded with your current selections, so you can switch to a different space, go back and choose a different outfit, or replace the avatar entirely.
* **Pose**: choose from Standing or Seated, each in Middle, Left, or Right variants. Available from the inspector panel only—there's no contextual-menu equivalent for `Pose`, unlike `Camera`.
* **Zoom**: choose from the available zoom levels for the avatar (for example, `Wide` / `Mid` / `Close`).
* For deeper customization—designing outfits and spaces from scratch, uploading reference images, or generating B-roll—see [Customize an avatar](#customize-an-avatar) below.
## Customize an avatar
### Reference images and brand kits are Enterprise features.
Applying a brand kit via the `Branding` pill and uploading reference images for a customizable avatar's outfit and space are available on Enterprise plans.
Customizable avatars—Synthesia's customizable avatars and Personal avatars from photo—support deep customization: unlimited outfits, your brand kit, reference images for outfit and space, text prompts, and B-roll. There are two ways to reach this customization, depending on how much you want to change.
### Note:
Reference images for outfits and spaces must be PNG, JPG, or WebP, at least 480px wide, and under 20MB.
To [customize just the outfit or the space](#from-the-contextual-menu) (with optional branding), select the Customize Avatar icon from the contextual menu:
For full customization, where you can customize any combination of avatar, space, pose, and branding, all in one go, [use the avatar picker](#from-the-avatar-picker) from the inspector panel on the right:
### From the contextual menu
Selecting the pencil icon (`Customize Avatar`) in an avatar's contextual menu opens a narrower editor scoped to the avatar you already have in your scene:
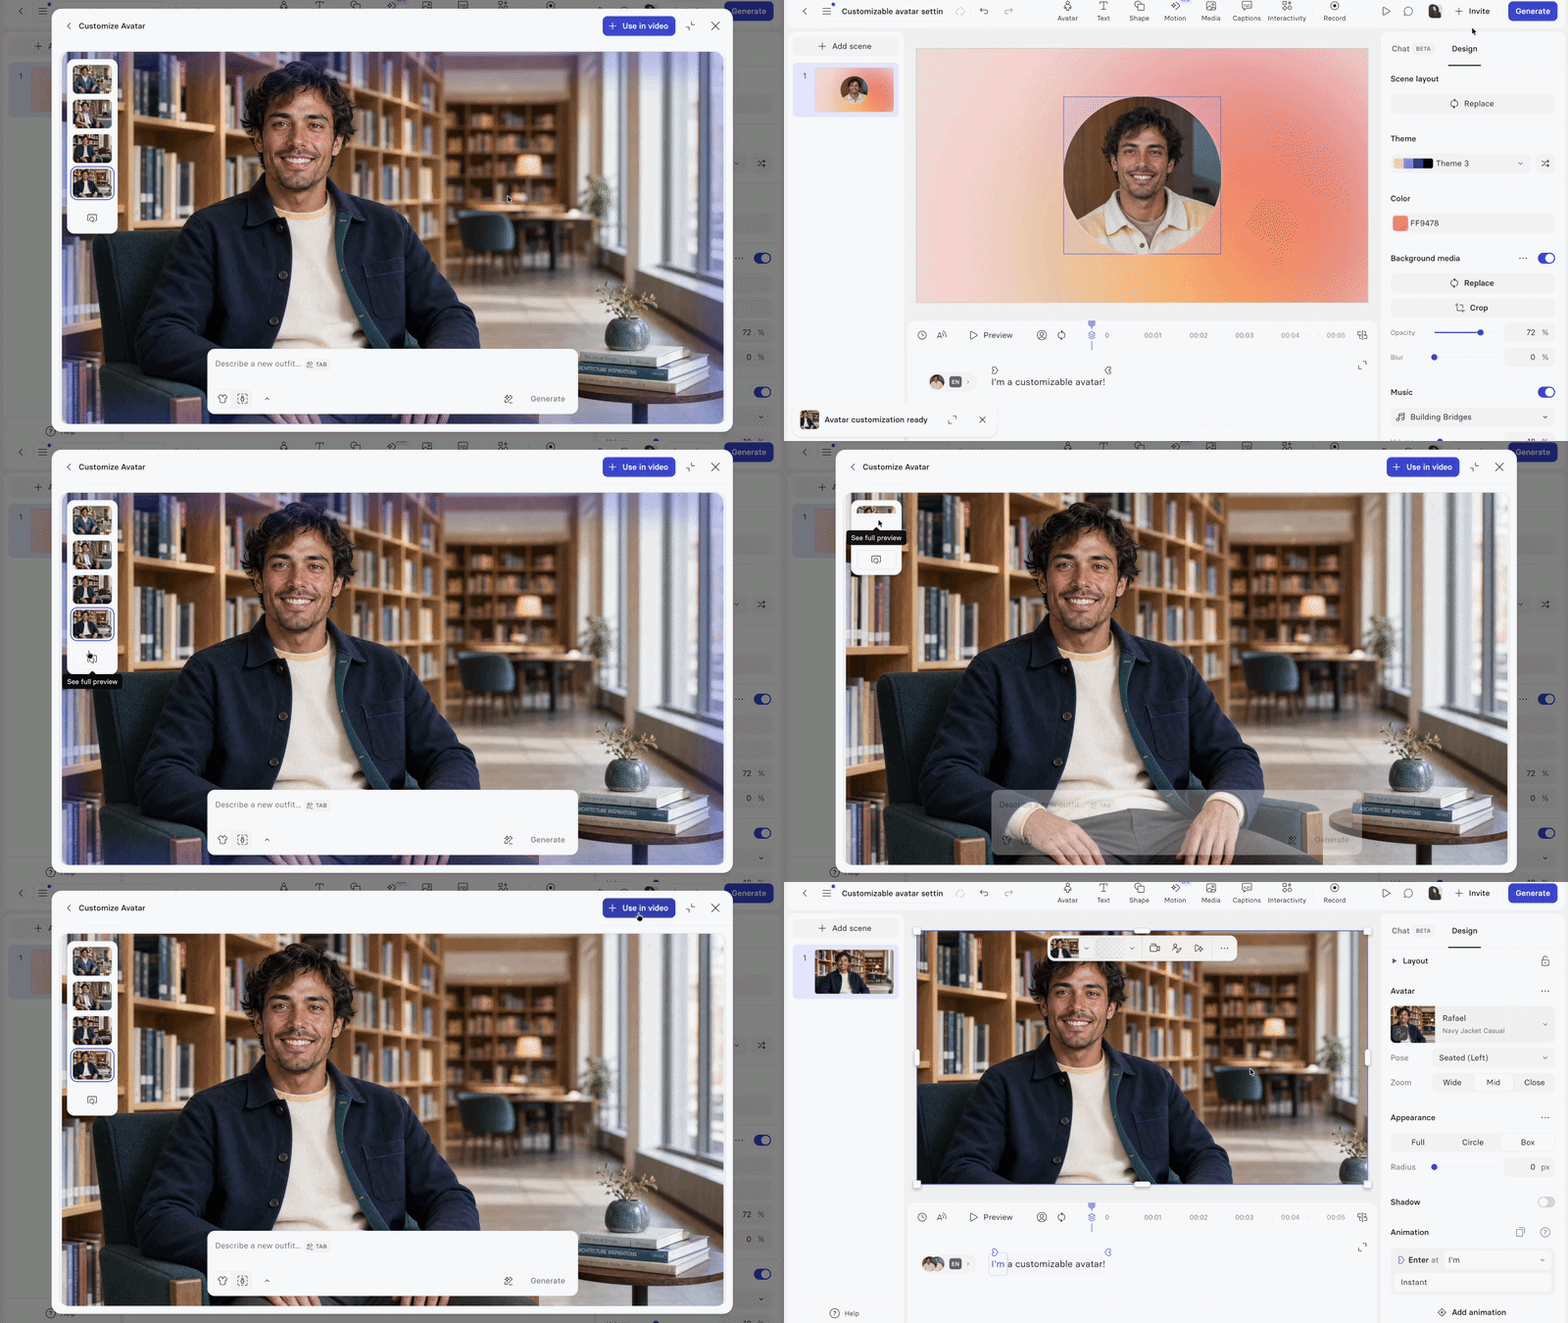
* Toggle between **Outfit** and **Space** editing modes using the shirt and background icons at the bottom-left of the prompt box.
* Each mode shows its own prompt ("Describe a new outfit..." or "Describe a new space...") along with `Branding` and an `Outfit` or `Space` reference-image slot.
* Reference images for outfits and spaces must be PNG, JPG, or WebP, at least 480px wide, and under 20MB.
* A prompt box ("Describe your outfit and space for your Avatar...") accepts a text description. Select the box and press `Tab` to auto-fill a prompt based on your script, or select the AI-assist button to do the same. If you have a brand kit applied, the colors from your brand kit will be included as part of the prompt.
* Click `Generate` to generate the customization—you can minimize the customization modal while the avatar generates.
* A toggle at the top-left of the modal switches between `Show prompt` (reveals the editing controls) and `See full preview` (hides them for an unobstructed view of the avatar).
* Select `Use in video` to apply your changes—the outfit and space will be available for future use in any of your videos.
### Note:
The sparkling play icon (`Create media`) in the same contextual menu is a shortcut to a different tool: it opens `Create with AI` in the Media panel with this avatar pre-selected, for generating B-roll video or images rather than editing the avatar's outfit or space. See [Media](https://docs.synthesia.io/docs/media#create-with-ai-third-party-model-integrations).
### From the avatar picker
Selecting `Customize Avatars` from the `Spaces` step of the avatar picker (or from the `Avatar` button in the toolbar) opens a modal where you can design any combination of avatar, pose, outfit, and space:
* **Avatar**, **Pose**, and **Branding** pills at the top let you choose the avatar, its pose (Standing/Seated × Middle/Left/Right), and a brand kit to apply.
* **Outfit** and **Space** each have their own reference-image slot, so you can upload a photo to guide the generation for either one independently.
- A prompt box ("Describe your outfit and space for your Avatar...") accepts a text description. Select the box and press `Tab` to auto-fill a prompt based on your script, or select the AI-assist button to do the same. If you have a brand kit applied, the colors from your brand kit will be included as part of the prompt.
- `Generate` creates the outfit and space based on your prompt and any reference images.
- **Begin with a preset**: a scrollable set of ready-made outfit-and-space personas (for example, Librarian, Product Manager, Corporate Trainer). Selecting one fills the prompt box with a starting description for you to edit—it doesn't generate automatically.
## Adding a variable
From the Avatar section of the inspector panel, you can also add a variable to the avatar. This applies to any avatar type.
[Adding a variable to the avatar](https://docs.synthesia.io/reference/guide-create-a-video-from-template#avatar-variables) lets you specify a different avatar to use in its place when you create a video via Synthesia's API.
### Note:
Variables let you use Synthesia's API to control the content of your videos. See the [Guide: Create a video from template](https://docs.synthesia.io/reference/guide-create-a-video-from-template) page to learn how to use this feature.
## Hiding an avatar
To hide your avatar but keep using its voice to deliver lines in the script, select the speaker pill in the script box, then select the eye icon to toggle its visibility. You can toggle the visibility back on to restore the avatar to the canvas from the speaker pill.
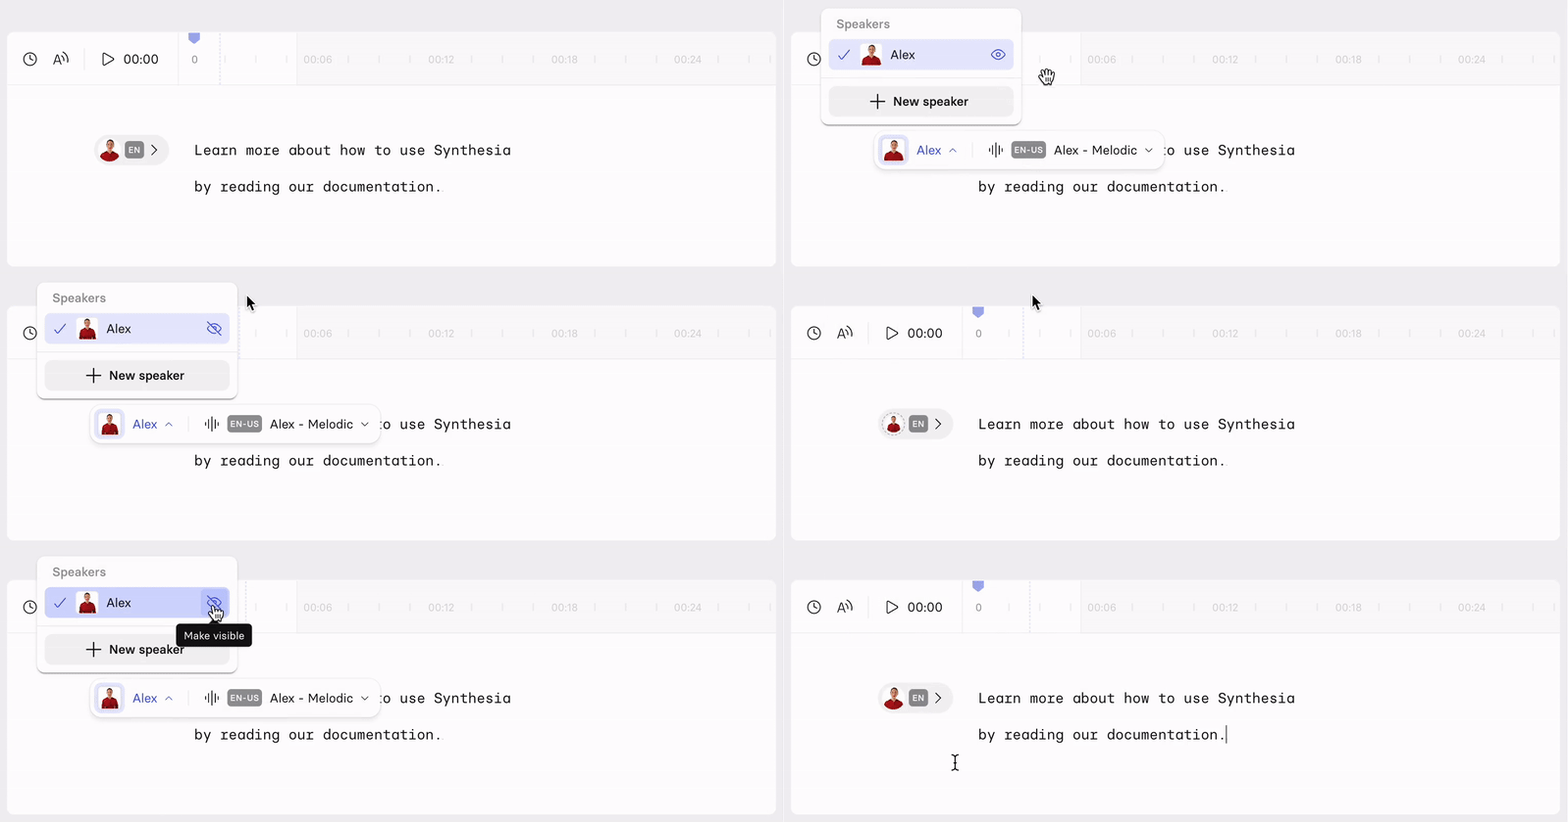
Alternatively, you can select the avatar and delete it from the canvas. The avatar remains as the speaker for its lines in the script. If there are two or more avatars in the scene, their lines aren't automatically reassigned to the remaining visible avatars when you delete one from the canvas.
## Exporting avatars
Avatars are designed for use within Synthesia projects and can't be exported with a transparent background.
# Sibling pages
* [Text](https://docs.synthesia.io/docs/text.md)
* [Shape](https://docs.synthesia.io/docs/shape.md)
* [Motion](https://docs.synthesia.io/docs/motion-graphics.md)
* [Media](https://docs.synthesia.io/docs/media.md)
* [Captions](https://docs.synthesia.io/docs/captions.md)
* [Interactivity](https://docs.synthesia.io/docs/interactivity.md)
* [Record](https://docs.synthesia.io/docs/record.md)
# What’s Next
* [Personal Avatars](https://docs.synthesia.io/docs/personal-avatars.md)
* [List of stock avatars](https://docs.synthesia.io/reference/avatars.md)
* [Video Creation](https://docs.synthesia.io/docs/video-creation.md)
* [Why is my Avatar not moving?](https://help.synthesia.io/en/articles/9614926-why-is-my-avatar-not-moving)